In This Article
✨Was this helpful? Spread the word!
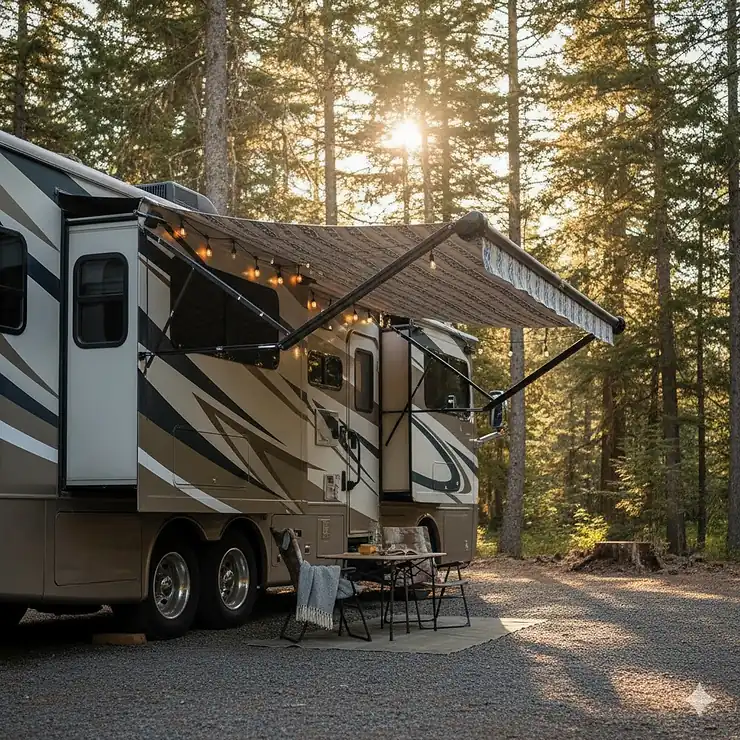
Picture this: you’re pulling your slide back into your camper after a weekend camping trip, and there it is—a pile of wet leaves, bird droppings, and pine needles that have collected on top. Not exactly the relaxing end to your adventure you’d hoped for, right? That’s where a camper bump out awning becomes your RV’s best friend.
A camper bump out awning—also called a slide out awning or slide topper—is essentially a protective canopy that automatically extends and retracts with your RV’s bump out section. Think of it as an umbrella for your slideout room, shielding it from debris, rain, snow, and harmful UV rays. Without one, moisture can seep into the seals, creating mold and mildew issues that cost hundreds to repair. According to industry experts, these awnings act as a protective barrier between the slide-out and outside elements, preventing damage from debris like large sticks or hail that can lead to costly repairs.
The investment makes sense financially too. Installing a bump out awning for your camper typically costs between $70 to $450, depending on whether you choose fabric-only replacements or complete kits. Compare that to the $500-$600 an RV shop might charge for repairs to damaged slide seals, and you’re looking at preventive maintenance that actually pays for itself. Plus, you’ll spend less time scrubbing gunk off your slideout and more time enjoying the great outdoors.
Quick Comparison Table
| Product | Type | Price Range | Fabric Weight | Best For |
|---|---|---|---|---|
| RecPro RV Slide Out Awning | Fabric Only | $70-$120 | 1000D Vinyl | Budget replacements |
| Solera 5000 Series | Complete Kit | $250-$450 | 13.5 oz Vinyl | Premium integrated look |
| Dometic EZ SlideTopper | Complete/Fabric | $180-$350 | Stain-resistant | OEM quality |
| Carefree Universal | Fabric Only | $90-$200 | 12 oz Vinyl | Cut-to-fit flexibility |
| Kohree Complete Kit | Complete Kit | $140-$280 | 19 oz 4-Ply | Best value complete kit |
| ShadePro Slide Topper | Fabric Only | $85-$165 | 15 oz Vinyl | Trim-to-fit premium |
| Awnlux Modular | Complete Kit | $160-$320 | 16 oz 4-Layer | Modular design |
Just one click – help others make better buying decisions too!
✨ Ready to Protect Your Investment? ️
Don’t wait until water damage becomes a costly problem! Each of these bump out awning solutions offers proven protection. Click on any product above to check current Amazon pricing and customer reviews. Your RV slideout deserves the best defense against the elements—and your wallet will thank you later!
Top 7 Camper Bump Out Awning Products: Expert Analysis
1. RecPro RV Slide Out Awning Fabric
The RecPro RV Slide Out Awning fabric stands out as the go-to budget option for RVers who need a straightforward replacement without breaking the bank. This fabric-only solution works with your existing hardware, making it perfect if your frame is still in good shape but the fabric has seen better days.
Key Specifications:
- Material: 1000D PVC tarpaulin vinyl
- Thickness: 1/16 inch
- Tensile strength: 140 PSI
- Available sizes: 46″ x 110″ to 46″ x 200″
- Colors: Black or white
Pricing: $70-$120 depending on size
What makes RecPro special is its versatility. The fabric comes with heat-bonded seams that won’t leak or tear, and it’s both weather-resistant and UV-resistant. According to the manufacturer, this vinyl material can withstand storms and long, hot days with a tensile strength of 140 PSI, ensuring it lasts through the test of time. Customers consistently praise how easy it is to cut to size—you can literally customize it with scissors and side cutters in under an hour.
Customer Feedback: One verified buyer noted, “An RV shop would want $500 to $600 to do what I did in one hour for less than $80.” The main complaint? Some users wish the instructions were more detailed, though most find installation intuitive with YouTube tutorials.
✅ Pros:
- Incredibly affordable
- Easy to customize and cut to size
- Flame retardant and environmentally friendly
❌ Cons:
- Fabric only (hardware sold separately)
- May wrinkle initially (stretches out with use)
Best For: DIY enthusiasts and budget-conscious RVers with existing slide topper hardware
2. Solera 5000 Series Slide Topper Awning
If you want your bump out awning for your camper to look like it came from the factory, the Solera 5000 Series delivers that premium, integrated aesthetic. This isn’t just functional—it’s downright sleek.
Key Specifications:
- Material: 13.5 oz vinyl with heat-welded seams
- Enclosed head design with flat-oval crossbar
- Cold-crack tested to -25°F
- Available widths: 66″ to 192″
- Extension depth: 48″
Pricing: $250-$450 depending on size
The Solera stands apart with its attention to detail. The mounting brackets come with trim plates that hide the bolts, creating that seamless look you’d expect from a luxury RV. The heavy-duty 13.5 oz vinyl is constructed with heat-welded, leak-proof seams to prevent water infiltration and damage, and it’s been tested to withstand temperatures as low as -25°F without cracking. The anti-billow mechanism prevents the cover from flapping during travel—a feature you’ll appreciate on windy highways.
Customer Feedback: Installation typically takes 2-3 hours with a helper. Users particularly love how the Solera matches their existing awnings perfectly. One customer saved nearly $2,000 by installing three Solera toppers themselves instead of using a dealership.
✅ Pros:
- Premium integrated appearance
- Prevents water pooling with proper slope
- Extremely durable in extreme temperatures
❌ Cons:
- Higher price point
- Requires careful measurement for proper fit
Best For: RV owners who prioritize aesthetics and don’t mind investing in premium quality
3. Dometic EZ SlideTopper
The Dometic EZ SlideTopper brings OEM-quality engineering to the aftermarket. As one of the most recognized names in RV accessories, Dometic’s reputation for reliability is well-earned.
Key Specifications:
- Stain and mildew-resistant vinyl
- Anti-billow mechanism
- Automatic extension/retraction
- Maximum slide extension: 42″
- Available in various sizes (measure edge-to-edge, add 6″)
Pricing: $180-$350 for complete units
What sets Dometic apart is the modernized design that actually looks contemporary. The anti-billow mechanism keeps the fabric taut during travel, so you’re not dealing with that annoying flapping sound. The EZ SlideTopper is designed to keep debris off the roof of your slideout with stain and mildew-resistant vinyl construction that extends and retracts automatically. Installation requires no additional switches or levers—it simply works with your existing slide mechanism.
Customer Feedback: Most users find the Dometic system intuitive, though some mention the instructions could be clearer. The quality is consistently rated high, with many customers noting it matches or exceeds their original equipment.
✅ Pros:
- OEM-quality construction
- Trusted brand with excellent warranty support
- Modernized, clean design
❌ Cons:
- Won’t work on slides extending over 42″
- Hardware typically sold separately
Best For: RVers who want factory-level quality and proven reliability
4. Carefree Universal RV Slideout Awning Fabric
The Carefree Universal fabric replacement is all about flexibility. If you have an oddball size or just want maximum control over your installation, Carefree’s cut-to-fit approach is genius.
Key Specifications:
- Material: 12 oz vinyl with FLXguard protection
- Comes in 200″ length rolls
- Various width options (71″ to 162″)
- Pre-installed polycords for easy installation
- Compatible with Carefree, Dometic, Lippert, and A&E
Pricing: $90-$200 depending on width
The beauty of Carefree is its universal compatibility. The fabric is designed to work seamlessly with popular slide-out awning brands like Carefree, A&E, Dometic, and Lippert, ensuring broad compatibility across different RV models. The pre-installed polycords on both ends make installation straightforward—just measure, cut, and install. One customer ingeniously used a single roll to cover multiple smaller slide-outs, maximizing value.
Customer Feedback: Users consistently praise the fit and quality. “The 144″ Carefree fabric is actually 143.5″ and fits my slide topper with about 0.5″ extra space on each side—perfect,” one reviewer noted. The main criticism involves occasional quality control issues with crooked cuts, though these are rare.
✅ Pros:
- Cut-to-fit customization
- Works with multiple brands
- Durable FLXguard protection
❌ Cons:
- Requires working with pre-wound spring tension
- Occasional quality control issues
Best For: Owners with non-standard sizes or multiple slideouts to outfit
5. Kohree RV Slide Out Awning Kit
The Kohree Complete Kit is where value meets completeness. For RVers starting from scratch or replacing an entire system, this kit includes literally everything you need.
Key Specifications:
- Material: 19 oz 4-ply premium vinyl
- Width: 51″
- Available lengths: 79″ to 157″
- Includes: roller assembly, brackets, hardware, fabric rails
- Hot-pressed edges prevent fraying
Pricing: $140-$280 depending on size
Kohree doesn’t cut corners on materials. The kit features heavy-duty 19oz 4-ply premium-grade vinyl fabric that is waterproof and UV-resistant, with hot-pressed edges ensuring a stable finish without fringes or burrs. The aluminum accessories keep the weight down while maintaining strength. What’s impressive is that Kohree manages to undercut RV shop prices significantly while delivering comparable quality.
Customer Feedback: Installation typically takes 30-60 minutes with a partner. The main gripe? The included screws are somewhat cheap—several users recommend replacing them with better-quality hardware from a local store. Despite this, most find the awning functions perfectly after installation.
✅ Pros:
- Complete all-in-one solution
- Excellent value for money
- Comprehensive installation instructions
❌ Cons:
- Cheap screws included (easily replaced)
- Can be heavy for solo installation
Best For: First-time installers wanting everything in one box
6. ShadePro RV Slideout Topper
The ShadePro Slide Topper represents the sweet spot between premium materials and reasonable pricing. With over 45 years in the RV industry, ShadePro knows what works.
Key Specifications:
- Material: 15 oz 1000 denier vinyl
- Ultra-durable welded polycord hems
- Trim-to-fit sizing (93″ and under, 93″-140″, 140″-163″, 163″-199″)
- Cold-crack tested to -20°F
- Available in black or white
Pricing: $85-$165 depending on size
ShadePro’s welded polycord hems prevent the leaks that plague cheaper alternatives with sewn edges. The superior weatherproofing uses precision-welded sides that lay flat to ensure water can roll right off without pooling or penetrating the slide-out extension’s canopy. The trim-to-fit approach means you get a perfectly customized fit without paying for custom manufacturing.
Customer Feedback: Users consistently mention the quality difference compared to budget options. “The vinyl is noticeably thicker and more durable,” one long-term RVer observed. ShadePro’s customer service also receives high marks for helping with sizing questions.
✅ Pros:
- Premium welded construction
- Excellent weather resistance
- Responsive customer support
❌ Cons:
- Fabric only (no hardware)
- Requires accurate measurement
Best For: Quality-focused RVers wanting superior materials without the premium brand price
7. Awnlux Modular Slide Topper Awning
The Awnlux Modular system brings innovative engineering to the bump out awning space. Its modular design makes installation more stable and longer-lasting than traditional integrated systems.
Key Specifications:
- Material: 16 oz 4-layer 1000D PVC tarpaulin
- Temperature range: -49°F to 194°F
- Available sizes: 66″ to 192″ (22 size options)
- Aluminum alloy frame with enclosed head design
- Colors: Black or white
Pricing: $160-$320 depending on size
Awnlux has genuinely rethought how these awnings should be built. The modular design has passed installation stability tests and proves more stable than integrated products with a longer service life, offering compatibility with many leading awning brands. The enclosed head design with flat-oval support bar and bracket covers creates both durability and clean aesthetics. The extreme temperature rating means this awning won’t fail whether you’re camping in Arizona summers or Minnesota winters.
Customer Feedback: Installation experiences vary—some find it straightforward while others recommend watching multiple videos first. The quality consistently impresses buyers. “When I saw the price I wasn’t expecting such good quality. The vinyl is very thick and looks durable,” one customer shared.
✅ Pros:
- Extreme temperature tolerance
- Modular stability
- 22 size options for perfect fit
❌ Cons:
- Instructions could be more detailed
- Arms may be slightly short for some installations
Best For: RVers in extreme climates needing maximum durability
Understanding Camper Bump Out Awnings: The Basics
Let’s get real about what you’re actually buying here. A bump out awning for your camper goes by several names—slide out awning, slide topper, or slideout cover—but they all do the same essential job. These aren’t the recreational awnings you sit under for shade; they’re protective covers that automatically extend over your slide out room as it deploys.
The terminology can get confusing because “bump out” and “slide out” mean the same thing—that section of your RV that extends outward to create extra interior space. When that room slides out, the awning unfurls with it, creating a protective canopy over the top. When you retract the slide, the awning rolls back up automatically. No buttons, no cranks, no hassle.
Here’s what makes them essential: The slide-out awning acts as a protective barrier between the slide-out of your RV and outside elements, preventing debris such as large sticks or hail from causing damage that leads to costly repairs. Without this protection, everything from pine needles to bird droppings accumulates on your slide roof. That debris prevents proper sealing when you retract the slide, which means water can seep in. Water leads to mold. Mold leads to expensive repairs and potential health issues.
The physics are simple but effective. Most bump out awning fabrics are made from vinyl that’s coated and reinforced. They’re designed with a slight slope so water and debris naturally slide off rather than pooling. The best ones use heat-welded seams instead of stitching because needle holes—even tiny ones—can become leak points over time.
Materials matter significantly. You’ll see awnings rated by fabric weight (measured in ounces) and denier (which indicates thread thickness). A 13.5 oz vinyl with 1000 denier construction is solid mid-range quality. Premium options go up to 19 oz with 4-ply construction. Thicker isn’t always better though—you need to balance durability with the mechanical stress on your slide mechanism.
Types of Camper Bump Out Awnings Available
Complete Slide Topper Kits
Complete kits are the “everything included” option. You get the roller tube, mounting brackets, fabric, rails, and all necessary hardware in one package. This is ideal if you’re installing a slide topper for the first time or replacing a system that’s completely shot.
The advantage? Everything is engineered to work together. The roller tube matches the fabric width, the brackets fit the roller, and the hardware is sized appropriately. Brands like Kohree, Awnlux, and Solera excel here. The typical price range spans $140 to $450 depending on size and quality. Installation usually takes 1-3 hours with a helper.
The learning curve is steeper with complete kits since you’re mounting everything from scratch. However, you’re not dependent on your old hardware being compatible, which eliminates a major headache. Most manufacturers include comprehensive instructions and many have YouTube installation videos.
Fabric-Only Replacements
Fabric replacements are perfect when your frame and hardware are still solid but the fabric itself is faded, torn, or mildewed. These typically cost $70-$200, making them significantly cheaper than complete kits.
The key here is compatibility. You need to ensure your existing roller tube and mounting system will accept the new fabric. Most fabric replacements use standard polycord sizing (usually 0.167″ to 0.210″ oval-shaped), but it’s worth measuring your old fabric’s cords before ordering.
Brands like RecPro, Carefree, and ShadePro dominate this category. The beauty of fabric-only replacements is the quick installation—most experienced RVers can swap fabric in under an hour. The fabric comes with pre-installed cords that slide into your existing rails.
Universal vs. Brand-Specific Options
Universal awnings are designed to fit multiple RV brands and models. They typically have adjustable brackets and come in enough size variations to fit most slideouts. The advantage is availability and often lower prices due to economies of scale.
Brand-specific options are manufactured for particular RV makers or awning systems. Dometic and Solera fall into this category, producing awnings that integrate seamlessly with specific RV models. The fit is often better, and the aesthetics match factory installations more closely.
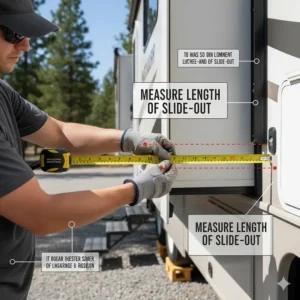
For most RVers, universal options work perfectly fine. The key is accurate measurement—measure the edge-to-edge distance of your slideout flange, not the interior room width. Add appropriate overhang (usually 2-3 inches per side) and you’ll get the coverage you need.
Installation Process: DIY vs. Professional Setup
DIY Installation Guide
Installing a camper bump out awning yourself is absolutely doable, even if you’re not particularly handy. I’ve seen plenty of first-timers successfully tackle this project in an afternoon. However, there are some important considerations before you grab your drill.
Tools You’ll Need:
- Power drill with appropriate bits
- Phillips and flathead screwdrivers
- Tape measure (critical for accuracy)
- Level
- Silicone sealant or butyl tape
- Helper (seriously, don’t try this solo)
- Ladder or step stool
Basic Installation Steps:
First, measure everything twice. The flange-to-flange distance on your slideout determines your fabric size. Most awnings need 2-3 inches of clearance on each side and at least 7 inches total for proper bracket mounting.
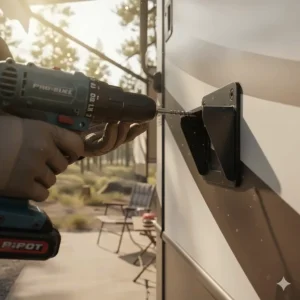
Mount the brackets first. These attach to your RV’s sidewall above the slideout. Use a level to ensure they’re perfectly horizontal—even a slight tilt can cause water pooling issues. Apply sealant around all screw holes to prevent water intrusion (this step is non-negotiable).
Next comes the roller assembly. With your helper holding the assembly level, slide the ends into the mounted brackets. The fabric should be pre-loaded on the roller tube. Secure everything before testing.
Install the fabric rail along the edge of your slideout opening. This rail holds one end of the fabric and guides it as the slide extends and retracts. Again, sealant is your friend here.
Finally, test the operation. Slowly extend your slideout while watching the awning unfold. It should unroll smoothly with the fabric staying taut. If it billows or seems loose, you may need to adjust the spring tension on the roller.
Common DIY Mistakes:
- Insufficient sealant leading to leaks
- Mounting brackets not level
- Choosing wrong fabric size
- Not pre-drilling fabric rail holes
- Attempting solo installation
Professional Installation Costs
RV dealers and mobile service providers typically charge $200-$400 for labor, plus the cost of materials. For a complete install including a quality awning, you’re looking at $500-$800 total. Some specialized RV service centers charge even more—up to $1,000 for premium installations with warranty.
The professional route makes sense if you’re not comfortable working on your RV, if you have mobility or strength limitations, or if your time is genuinely more valuable than the money saved. Professionals also have specialized tools and experience dealing with different RV models, which can prevent costly mistakes.
Mobile installation services have become increasingly popular. They come to your location, typically charge 20-30% less than dealership service departments, and can usually complete the job in 2-3 hours.
Time Investment Comparison
DIY installation time ranges from 2-6 hours depending on experience level and whether you’re installing fabric only or a complete kit. First-timers should budget a full Saturday afternoon. Experienced DIYers can often complete fabric replacements in under an hour.
Professional installation typically takes 2-3 hours start to finish, though you’ll need to factor in scheduling time. During peak RV season (spring and early summer), you might wait 2-3 weeks for an appointment.
The sweet spot for many RVers? Doing the research, buying quality components, and then hiring a mobile tech for just the installation labor. This saves money while ensuring professional results.
Key Features to Look for in Quality Awnings
Fabric Durability and Weather Resistance
The fabric is where your money actually lives, so understanding material quality is crucial. Vinyl remains the dominant material for bump out awnings because it balances waterproofing, UV resistance, and cost-effectiveness.
Fabric Weight: Look for at least 12 oz vinyl—anything lighter won’t last through multiple seasons. Mid-range options use 13.5-15 oz vinyl, while premium choices go up to 19 oz. Higher weight generally means better puncture resistance and longer lifespan.
Denier Rating: This measures thread thickness. A 1000 denier rating is standard for quality awnings. Some budget options use 600-800 denier, which won’t hold up as well over time.
Cold-Crack Testing: This specification tells you how the fabric performs in freezing temperatures. Quality awnings are tested to at least -20°F, with premium options handling -49°F. If you camp in winter, this matters significantly.
UV Resistance: All vinyl degrades in sunlight eventually, but quality fabrics include UV inhibitors that dramatically extend lifespan. Look for products specifically mentioning UV-resistant coatings or 4-layer construction that includes UV blocking.
Seam Construction: Heat-welded seams are superior to stitched seams. Period. Stitching creates tiny holes where water can eventually penetrate. Welded seams fuse the material together without punctures.
Hardware Quality and Frame Construction
The frame components bear the mechanical stress of extending and retracting thousands of times. Aluminum dominates here because it’s light, strong, and doesn’t rust.
Roller Tube: This is the core that the fabric wraps around. Look for at least 4mm thickness in aluminum alloy construction. Cheaper options use thinner material that can bend over time.
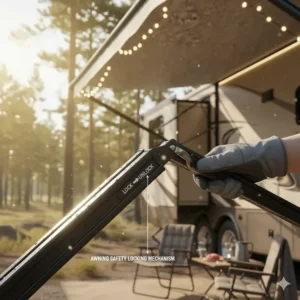
Spring Mechanism: The constant tension spring keeps fabric taut during operation. Higher-quality springs maintain tension better over years of use. Some systems use enclosed springs that protect against dirt and moisture.
Mounting Brackets: These take significant stress during travel. Premium brackets use reinforced designs with multiple mounting points. Budget brackets sometimes crack at stress points after a few years.
Bracket Covers: These aren’t just aesthetic—they protect mounting hardware from road debris and weather exposure. Enclosed head designs with protective covers last significantly longer.
Size Compatibility and Adjustability
Getting the size right is critical for proper function and protection. Here’s what you need to know about sizing:
Measure Twice, Order Once: Measure your slideout flange-to-flange distance (the outside edge of the trim on both sides). The fabric size should match this measurement, not the awning size. For example, a 120″ awning typically has 115″ fabric, accounting for the 5″ taken up by the roller and mounting hardware.
Extension Distance: Most awnings work with slideouts extending up to 42-48 inches. If your slide extends further, you’ll need to check manufacturer specifications carefully—not all awnings accommodate deeper extensions.
Adjustable Mounting: Premium systems offer 4-5 inches of vertical adjustment, letting you position the awning for optimal water runoff. This flexibility is particularly valuable on RVs with non-standard configurations.
Benefits of Installing a Bump Out Awning
Protection Against Weather Elements
The weather protection value of a camper bump out awning extends far beyond keeping your slide dry. Let’s break down the specific benefits:
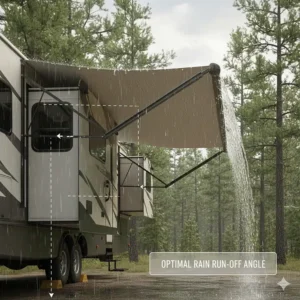
Rain Protection: The most obvious benefit—keeping water off your slide roof prevents it from pooling and seeping into seals. Even small seal breaches can lead to interior water damage costing thousands to repair. The awning’s slope directs water away from vulnerable seal areas.
Sun Protection: UV radiation degrades rubber seals and causes interior fabrics to fade. A quality awning blocks 95-99% of UV rays, significantly extending the life of your slideout components. If you frequently camp in sunny climates, this protection alone justifies the cost.
Snow and Ice: Winter camping enthusiasts know the frustration of ice building up on slideout roofs. An awning prevents accumulation, making slide retraction much easier. It also prevents the freeze-thaw cycles that damage seals.
Wind-Blown Debris: Leaves, twigs, pine needles, and other debris can’t accumulate on a covered slide. This matters more than you might think—debris holds moisture against seals, accelerating deterioration.
Prevention of Mold and Mildew
Mold inside your RV isn’t just unsightly—it’s a legitimate health concern. When debris accumulates on the slide without protection, it can prevent proper sealing when the slide is retracted, allowing rain water to get in and pool on top, potentially leading to mold formation. The mold then gets trapped inside your RV when you close the slide.
A bump out awning breaks this cycle by keeping the slide roof clean and dry. Even if you’re meticulous about cleaning your slide before retracting it, an awning provides ongoing protection between uses. For RVers who leave their slides extended for weeks at a time, this protection is invaluable.
The moisture control benefits extend to your RV’s interior temperature regulation too. A covered slide stays cooler in summer, reducing the load on your air conditioning system. In winter, the awning provides a small insulating effect that helps retain warmth.
Extended Slideout Lifespan
Your RV’s slideout system represents a significant portion of your rig’s value. Slide mechanisms, seals, and related components can cost $2,000-$5,000 to repair or replace. A $150-$400 awning protecting that investment is obvious financial sense.
The math works like this: quality slideout seals last 5-7 years with proper care. Without awning protection, you might see 3-4 years before seal replacement becomes necessary. The awning essentially pays for itself through extended component life.
Beyond seals, the entire slide mechanism benefits from protection. Water intrusion can lead to electrical issues, damaged flooring, and frame rot—all catastrophically expensive problems. Prevention through a simple awning installation is far cheaper than any of these repairs.
Common Problems and Solutions
Water Pooling Issues
Water pooling on top of your awning frustrates many RV owners, especially after heavy rain. The problem usually stems from improper installation or insufficient fabric tension.
Solution 1: Adjust Mounting Height: The fabric rail mounted on your slideout opening should be positioned so the awning has a downward slope away from the RV. Even 1-2 inches of height difference creates enough angle for water to sheet off.
Solution 2: Increase Spring Tension: If your fabric sags, water will pool in the low spots. Most roller assemblies have adjustable spring tension. Carefully follow manufacturer instructions to increase tension—too much can strain the roller mechanism.
Solution 3: Check for Fabric Stretch: Over time, vinyl fabric can stretch slightly, creating low spots. If your awning is several years old and no longer taught, fabric replacement might be necessary rather than endless adjustment attempts.
Temporary Fix: Some RVers use an awning stick to push up the center of the fabric after rain, allowing pooled water to drain. This works in a pinch but isn’t a long-term solution.
Fabric Tears and Damage
Even quality awning fabric can tear—usually from branches, sharp ice, or improper retraction. Minor tears under 2-3 inches can be repaired rather than replacing the entire fabric.
Patch Kit Repairs: Marine vinyl repair kits work excellently for small tears. Clean the area thoroughly, apply the patch according to kit instructions, and allow full curing time. These repairs can last years if done properly.
Tear Prevention: Trim overhanging branches before parking under trees. This single preventive step eliminates the most common cause of fabric tears. Also, never force a slide to retract if the awning hasn’t fully retracted—the fabric can catch and tear.
When to Replace: If tears exceed 4-5 inches, occur near stress points like the roller attachment, or if you have multiple damaged areas, replacement becomes more practical than repair. Factor in fabric age too—if it’s over 5 years old with damage, replacement makes more financial sense.
Installation Mistakes and Fixes
Even experienced DIYers make mistakes. Here are the most common issues and how to address them:
Misaligned Brackets: This causes the roller to sit crooked, leading to uneven fabric deployment. Fix it by loosening mounting bolts, using a level to establish proper alignment, then retightening while checking the level repeatedly.
Incorrect Fabric Size: If you ordered fabric that’s too short, you’re unfortunately stuck ordering the correct size. Too long? Most fabrics can be trimmed, though you’ll need to reattach the polycord using proper techniques.
Seal Leaks: Forgetting to seal screw holes leads to water intrusion behind your RV’s walls. Even if you’ve discovered leaks months after installation, it’s worth removing screws, applying butyl tape or quality sealant, and reinstalling properly.
Spring Tension Issues: Too loose and the fabric sags; too tight and it can damage the roller mechanism or strain the slide mechanism. Adjust incrementally, testing after each adjustment until you achieve proper tension.
Maintenance and Care Tips
Regular Cleaning Practices
A clean camper bump out awning lasts longer and looks better. The good news? Maintenance is straightforward and doesn’t require special products.
Monthly Cleaning Routine:
Mix mild soap (dish soap works fine) with water in a bucket. Using a soft-bristle brush or sponge, gently scrub the fabric from the center outward. Pay special attention to areas where water typically runs off—these accumulate the most grime.
Rinse thoroughly with a garden hose. Incomplete rinsing leaves soap residue that can attract dirt and potentially damage vinyl over time. Let the fabric air dry completely before retracting your slide.
For stubborn stains like tree sap or bird droppings, apply cleaner and let it sit for 5-10 minutes before scrubbing. Avoid harsh chemicals or abrasive brushes that can damage the vinyl coating.
Seasonal Deep Cleaning:
Twice yearly, give your awning a thorough cleaning with specialized RV awning cleaner like 303 Fabric Guard or similar products. These cleaners often include UV protectants that help extend fabric life.
After cleaning, inspect the fabric carefully for small tears, worn spots, or seam separation. Catching problems early prevents them from becoming major issues.
Seasonal Storage Considerations
If you store your RV for extended periods, proper awning care during storage can prevent damage and extend lifespan.
Winter Storage: In freezing climates, some RVers retract their slides for storage to protect the awning from snow load and ice damage. If you leave slides extended, occasionally brush off heavy snow accumulation.
Summer Storage: UV damage accelerates during hot months. If possible, park your RV under cover or use an RV cover that protects slideouts. Alternatively, you can apply UV protectant spray designed for vinyl fabrics every 2-3 months during peak summer.
Indoor Storage: If you have the luxury of indoor storage, your awning will last significantly longer. The controlled environment prevents UV damage, temperature extremes, and moisture exposure.
Before storing your RV for any length of time, clean the awning thoroughly and ensure it’s completely dry. Storing a damp awning invites mold and mildew growth.
When to Replace Your Awning
Even well-maintained awnings eventually need replacement. Watch for these signs:
Visible Deterioration: Extensive fading, multiple tears, or vinyl that feels brittle or chalky indicates the material has reached the end of its useful life.
Seal Failure: If your awning fabric is separating from the polycord attachments, replacement is necessary. These seals are critical for proper function.
Persistent Leaks: If you’re finding water inside your slideout despite having an awning, and you’ve ruled out other entry points, the awning fabric may have developed micro-pores that allow water penetration.
Age: Most quality awning fabrics last 5-7 years with proper care. If yours is approaching or exceeding this age, consider proactive replacement rather than waiting for failure.
The beauty of fabric-only replacements is that you can refresh your awning’s appearance and protection for $70-$200 without touching the frame hardware. This makes maintaining optimal protection affordable.
Price Comparison and Value Analysis
Budget vs. Premium Options
Understanding what you’re actually paying for helps make informed decisions about your camper bump out awning investment.
Budget Range ($70-$150): These options typically include fabric-only replacements from brands like RecPro or generic manufacturers. You’re getting basic vinyl (usually 12-13 oz) with standard UV and water resistance. Expected lifespan runs 3-5 years with proper care.
Budget options make perfect sense if you’re working on an older RV you plan to trade soon, if you need a temporary solution, or if you’re handy and can replace fabric again in a few years without much hassle.
Mid-Range ($150-$280): This sweet spot includes quality fabric replacements and entry-level complete kits. Brands like Kohree, Carefree, and some ShadePro options live here. Fabric weights jump to 15-16 oz with better UV protection and often include features like heat-welded seams.
Most RVers find mid-range options offer the best value. You’re getting significantly better durability than budget options without paying for premium branding. Expected lifespan extends to 5-7 years.
Premium Range ($280-$450): Premium options from Solera, Dometic, and high-end ShadePro/Awnlux products feature the heaviest fabric (16-19 oz), superior hardware, aesthetic details, and best warranties. Expected lifespan can reach 7-10 years.
Premium makes sense for newer, expensive RVs where you want factory-quality appearance, for full-time RVers who depend on their RV year-round, or if you plan to keep your rig for many years.
Long-Term Cost Savings
Let’s run the real numbers on why a camper bump out awning pays for itself:
Scenario 1: No Awning Protection
- New slideout seals every 3-4 years: $300-$600
- Professional installation: $200-$400
- Potential water damage repairs (10-year period): $500-$2,000
- Total 10-year cost: $1,500-$3,600
Scenario 2: With Quality Awning
- Initial awning investment: $200-$300
- Replacement fabric at year 6: $100-$150
- Seals last full 7-8 years: $300-$600 (once)
- Professional seal installation: $200-$400
- Total 10-year cost: $800-$1,450
The math shows potential savings of $700-$2,150 over a decade. And that doesn’t account for the convenience factor—less frequent maintenance means more time actually enjoying your RV.
Even better, many RVers who install awnings never experience the major water damage issues that plague unprotected slideouts. That’s potentially thousands more in avoided costs that don’t show up in the basic calculations.
Hidden Costs to Consider
Beyond the sticker price, factor in these additional expenses:
Installation Supplies:
- Sealant/butyl tape: $10-$20
- Extra screws/hardware: $5-$15
- Tools (if you don’t have them): $50-$100
Professional Installation: If you’re not comfortable doing it yourself, budget $200-$400 for labor. Mobile techs often charge less than dealerships.
Potential Modification Costs: Occasionally, RVs have non-standard configurations requiring custom mounting solutions. A good mobile tech can usually adapt installations for an additional $50-$100.
Warranty Considerations: Some awning manufacturers require professional installation to maintain warranty coverage. Factor this into your decision-making process.
Removal of Old Awning: If replacing an existing system, you’ll spend time (or money) removing the old hardware. Budget 1-2 hours of labor if doing it yourself.
Frequently Asked Questions
❓ What is the average lifespan of a camper bump out awning?
❓ Can I install a bump out awning myself without professional help?
❓ Will a slide topper awning work in extreme cold or hot climates?
❓ How do I measure for the correct bump out awning size?
❓ Can I replace just the fabric or do I need the entire awning assembly?
Conclusion: Making the Right Choice
Choosing the right camper bump out awning comes down to understanding your specific needs, budget, and DIY comfort level. If you’re working with an older RV or have mechanical skills, a budget fabric replacement from RecPro or Carefree can deliver years of solid protection for under $120. The savings speak for themselves—you’re getting quality protection without paying for premium branding.
For RVers seeking that factory-fresh aesthetic or planning to keep their rig long-term, investing in premium options like Solera 5000 Series or Dometic EZ SlideTopper makes financial sense. The superior materials, better warranty coverage, and professional appearance justify the higher cost, especially on newer, expensive RVs.
The sweet spot for most people? Mid-range complete kits from Kohree or Awnlux offer excellent value—quality materials, all necessary hardware, and straightforward installation at prices that won’t break the bank. These options deliver 80% of premium performance at 50% of the cost.
Remember that any awning beats no awning. Even a budget option will save you hundreds in potential seal repairs and water damage over its lifespan. The key is buying from reputable manufacturers, measuring carefully, and installing properly with appropriate sealant around all penetrations.
Don’t overthink this decision. Identify your budget, measure your slideout accurately, choose a quality option within your price range, and install it with care. Your RV slideout will thank you with years of trouble-free operation, and you’ll spend less time scrubbing debris and more time enjoying your adventures.
Protect Your RV Investment Today! ️
Ready to safeguard your slideout from weather damage and debris? Browse the products highlighted in this guide to find the perfect bump out awning for your camper. Whether you choose budget-friendly fabric replacements or premium complete kits, you’re making a smart investment that pays dividends in prevented repairs and peace of mind. Click any product link to check current pricing and read verified customer reviews! ⭐
Recommended for You
- Best Electric Kettle for Camping: 7 Top Picks 2025
- Camping Toaster: 7 Best Camp Stove Toasters 2025
- Camping Kettle: 7 Best Portable Kettles for 2025
Disclaimer: This article contains affiliate links. If you purchase products through these links, we may earn a small commission at no additional cost to you.
✨ Found this helpful? Share it with your friends!