In This Article
Ever found yourself on a gorgeous mountain camping trip, only to discover your RV toilet is leaking all over the floor? Trust me, I’ve been there, and it’s not the kind of adventure story you want to tell around the campfire. Quality camper toilet parts aren’t just conveniences—they’re essential components that keep your mobile home comfortable, sanitary, and ready for the open road.
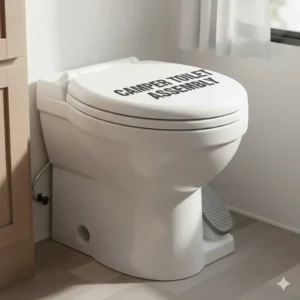
The RV toilet market has evolved dramatically, with manufacturers now offering parts that withstand freezing temperatures, resist leaks better than ever, and install in minutes without professional help. Whether you’re dealing with a constantly running toilet, mysterious odors, or water valve failures, having the right replacement parts on hand can save your weekend getaway from turning into a plumbing nightmare. In this comprehensive guide, you’ll discover the seven best camper toilet parts available in 2025, complete with specifications, pricing, and real-world performance insights from fellow RV enthusiasts.
Quick Comparison Table
| Product | Compatibility | Price Range | Key Feature | Rating |
|---|---|---|---|---|
| Dometic 385311641 Water Valve Kit | 300/310/320 Series | $12-$63 | Freeze-resistant design | ⭐⭐⭐⭐⭐ |
| Thetford 42049 Style II Valve | Aqua Magic Style II | $22-$40 | Complete kit with seals | ⭐⭐⭐⭐½ |
| YITAHOME 5.8 Gal Portable Toilet | Universal | $80-$110 | 110+ flushes capacity | ⭐⭐⭐⭐½ |
| Kohree 5.8 Gal Camping Toilet | Universal | $85-$120 | Diagonal elongated seat | ⭐⭐⭐⭐⭐ |
| RV Toilet Seal Kit 385311658 | Dometic 300/310/320 | $8-$15 | 2-pack value bundle | ⭐⭐⭐⭐ |
| Beech Lane Upgraded Valve Kit | Dometic 300/310/320 | $15-$25 | Ultrasonic sealing tech | ⭐⭐⭐⭐½ |
| AOMUCH Floor Flange Seal 33239 | Thetford 3-inch | $10-$18 | Universal fit design | ⭐⭐⭐⭐ |
💬 Just one click – help others make better buying decisions too! 😊
Top 7 Camper Toilet Parts: Expert Analysis
Finding the perfect camper toilet parts can feel like navigating a maze of model numbers and compatibility charts. After analyzing hundreds of products and customer reviews, I’ve identified seven standout options that deliver reliability, value, and peace of mind for your RV bathroom.
1. Dometic 385311641 Water Valve Kit – Premium OEM Quality
The Dometic 385311641 Water Valve Kit remains the gold standard for Dometic toilet owners. This genuine OEM part fits 300, 301, 310, 311, 320, and 321 series pedal-flush toilets perfectly.
Key Specifications:
- Includes water valve, hose clamp, mesh filters, and fasteners
- Freeze-resistant polypropylene construction
- Precision-threaded connections prevent leaks
Price: $12-$63 (varies by retailer and bundle options)
Customer Insights: RVers consistently praise the exact-fit design and durability. One verified buyer mentioned installing it in under 15 minutes and solving a persistent leak that had plagued three camping trips. The upgraded freeze-resistance technology means winter campers can finally enjoy peace of mind in cold climates.
✅ Pros:
- Genuine Dometic quality assurance
- Complete hardware kit included
- Exceptional cold-weather performance
❌ Cons:
- Higher price point than aftermarket options
- May require Phillips screwdriver and basic plumbing knowledge
2. Thetford 42049 Water Valve Style II Kit – Best for Aqua Magic Toilets
For Thetford Aqua Magic Style II toilet owners, the 42049 Water Valve Kit represents the most comprehensive replacement solution available. This kit addresses multiple failure points simultaneously, making it a smart preventive maintenance choice.
Key Specifications:
- Compatible with Aqua Magic Style II permanent toilets
- Includes valve cartridge, drive arm seals, water inlet components
- ABS plastic and metal construction for longevity
Price: $22-$40
Customer Feedback: Users appreciate the all-in-one approach—you’re not just replacing one component but refreshing the entire water valve system. Several reviewers mentioned eliminating water flow issues that simple valve replacements couldn’t fix. The installation instructions are clear, though watching a quick YouTube tutorial beforehand helps first-timers.
✅ Pros:
- Comprehensive component package
- Prevents multiple potential failure points
- Excellent value for complete system refresh
❌ Cons:
- Installation slightly more complex than basic valve swap
- Not compatible with other Thetford models
3. YITAHOME 5.8 Gallon Portable Toilet – Ultimate Flexibility
The YITAHOME 5.8 Gallon Portable Toilet isn’t technically a replacement part, but it’s become an essential backup for serious RVers. When your fixed toilet needs major repairs or you’re dry camping without hookups, this self-contained unit becomes invaluable.
Key Specifications:
- 3.2-gallon fresh water tank (110-120 flushes)
- 5.8-gallon waste tank with level indicator
- T-type water outlets for 360° cleaning
- Maximum load capacity: 441 lbs
Price: $80-$110
Real-World Performance: Campers love having this as their “Plan B.” The rotating spout makes emptying surprisingly clean, and the compact design fits in exterior RV compartments. One family used it exclusively during a week-long national park stay, reporting zero odor issues with proper chemical treatment. The hand sprayer attachment earned special praise for deep cleaning capabilities.
✅ Pros:
- Complete independence from RV plumbing systems
- Easy to carry and dump
- Leak-proof seal technology
❌ Cons:
- Requires storage space
- Manual pumping needed (no pedal flush)
4. Kohree 5.8 Gal Camping Toilet – Premium Portable Option
The Kohree 5.8 Gallon Camping Toilet takes portable toilet design to the next level with its diagonal elongated bowl seat—a game-changer for comfort during extended use. This unit suits RVers who want home-like comfort in their backup system.
Key Specifications:
- 13-inch elongated bowl seat (closest to standard home toilets)
- High-pressure bellows pump for efficient flushing
- HDPE and PP materials support up to 440 lbs
- Operating temperature range: -4°F to 122°F
Price: $85-$120
User Experience: The elongated seat receives unanimous praise in reviews. Multiple users specifically mentioned upgrading from round-bowl portables and never looking back. The T-type flush nozzle provides thorough cleaning with each flush, and the waste tank’s 5.8-gallon capacity means fewer dump trips compared to smaller units.
✅ Pros:
- Superior comfort with elongated seat design
- Exceptional build quality
- Works reliably in extreme temperatures
❌ Cons:
- Slightly larger footprint than compact models
- Premium pricing tier
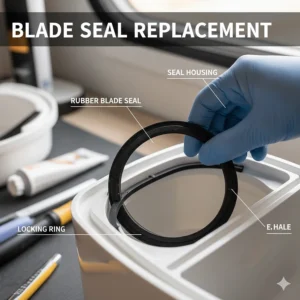
5. RV Toilet Seal Replacement Kit 385311658 – Essential Maintenance Part
If you’re experiencing water level drops in your Dometic toilet bowl or detecting unpleasant odors, the 385311658 Flush Ball Seal is likely your culprit. This high-grade rubber seal maintains the water barrier between your bowl and waste tank.
Key Specifications:
- Compatible with Dometic 300, 310, 320 series
- Premium rubber material with temperature resistance
- 2-pack value bundle (most listings)
Price: $8-$15 for 2-pack
Performance Notes: Seasoned RVers know to replace these seals every 2-3 years as preventive maintenance. The rubber naturally degrades over time, especially with exposure to holding tank chemicals. Users report immediate elimination of odor problems and restored water retention after installation. The seal installs in under 10 minutes—just remove the old, wipe clean, and press the new one into place.
✅ Pros:
- Affordable preventive maintenance
- Solves common toilet bowl issues
- Two-pack offers backup or future replacement
❌ Cons:
- Must match exact Dometic model
- Requires periodic replacement (not permanent fix)
6. Beech Lane Upgraded Water Valve Kit – Advanced Engineering
The Beech Lane Upgraded Water Valve Kit represents the latest advancement in aftermarket RV toilet technology. Their ultrasonic sealing technology addresses the primary failure mode of traditional valve kits—the junction between cap and body.
Key Specifications:
- Replaces Dometic 385311641 with enhanced features
- Glass fiber-reinforced polymer structure
- Ultrasonic welding prevents separation failures
- Increased freeze resistance down to -20°F
Price: $15-$25
Technical Innovation: What sets Beech Lane apart is their manufacturing process. Traditional valves use rotary melting to join components, which can develop micro-cracks over time. Beech Lane’s ultrasonic sealing creates molecular bonds that withstand pressure cycling better. Several reviewers specifically bought this after standard valves failed during winter storage, reporting zero issues through subsequent freeze-thaw cycles.
✅ Pros:
- Superior freeze resistance
- Advanced manufacturing techniques
- Excellent price-to-performance ratio
❌ Cons:
- Aftermarket brand (not OEM)
- Slightly different installation feel than original
7. AOMUCH 33239 Thetford Floor Flange Seal – Critical Foundation Component
Often overlooked until disaster strikes, the AOMUCH 33239 Floor Flange Seal creates the crucial seal between your Thetford toilet base and the floor-mounted waste pipe. When this fails, you’ll know immediately—and it won’t be pleasant.
Key Specifications:
- Fits standard 3-inch waste hole
- Black rubber construction
- Compatible with Thetford RVs, campers, trailers
Price: $10-$18
Installation Reality: This seal gets compressed over years of use and exposure to waste gases. Smart RVers replace it whenever removing the toilet for any reason—it’s cheap insurance against catastrophic leaks. One reviewer saved their flooring by catching a failing seal early, noting slight moisture around the toilet base. The replacement process requires unbolting the toilet, cleaning the flange area thoroughly, and positioning the new seal before reattaching.
✅ Pros:
- Prevents expensive water damage
- Universal 3-inch fit
- Long-lasting rubber compound
❌ Cons:
- Requires toilet removal for installation
- Not a quick roadside repair
✨ Don’t Miss These Exclusive Deals!
🔍 Take your RV bathroom to the next level with these carefully selected products. Click on any highlighted item to check current pricing and availability. These tools will help you create authentic comfort your family will love!
Understanding Camper Toilet Systems: Types and Components
RV toilets operate fundamentally differently than residential toilets, and understanding these differences helps you select the right replacement parts. According to the EPA’s guidelines on safe wastewater disposal, proper RV sanitation systems are crucial for environmental protection and public health.
Gravity-Flush vs. Macerating Systems
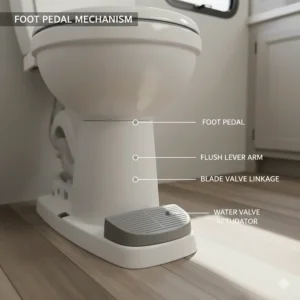
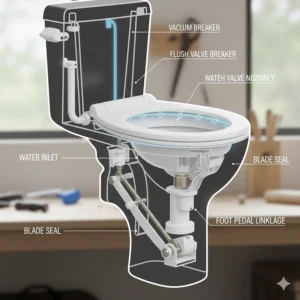
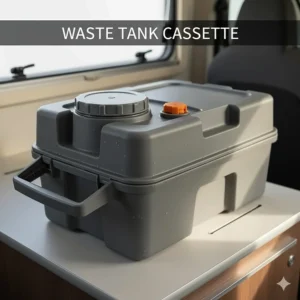
Most campers utilize gravity-flush toilets with a blade valve mechanism. When you press the foot pedal, the valve opens, and water flows from a small reservoir while gravity pulls waste directly into the black water holding tank below. This design conserves precious water—critical when you’re boondocking without hookups—but requires different maintenance than home toilets.
Macerating toilets, conversely, use a grinding pump to pulverize waste before sending it to the holding tank. These systems allow more flexible toilet placement (not directly over the tank) and use even less water per flush. However, they introduce additional mechanical components that may need eventual service or replacement.
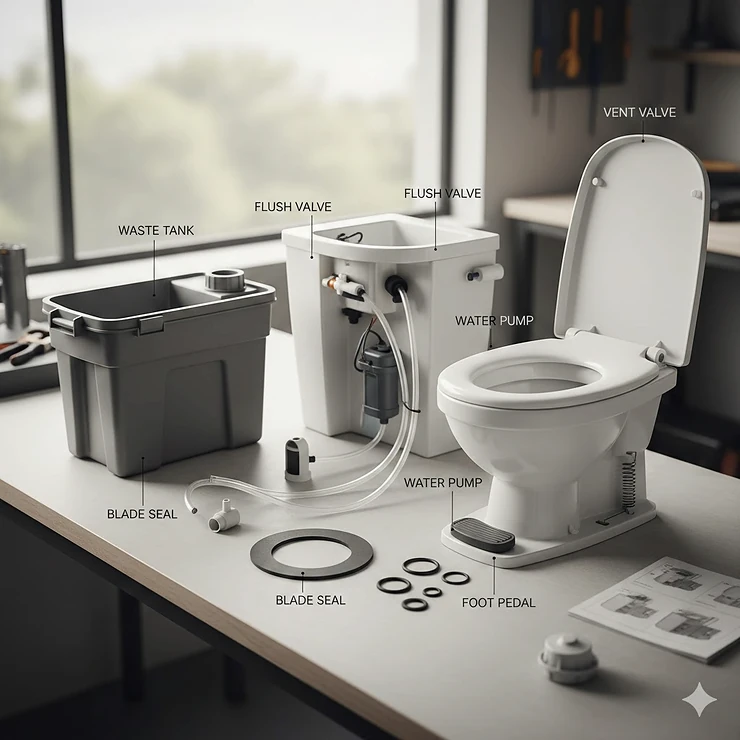
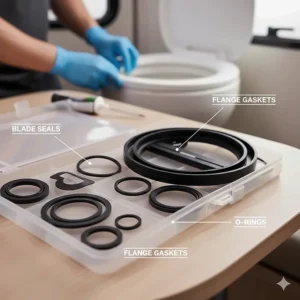
Key Components That Fail (And Why)
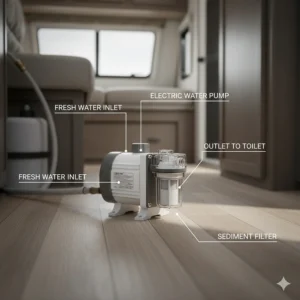
Water Valves: The most common failure point. Constant water pressure, temperature fluctuations, and mineral deposits cause valve seals to degrade. Symptoms include continuous water flow into the bowl or weak flush pressure.
Flush Ball Seals: These rubber seals maintain the water barrier in your bowl. Chemical exposure, UV degradation (from sunlight), and simple wear cause them to compress and crack, leading to water loss and odor problems.
Floor Flange Seals: Hidden beneath your toilet, these seals prevent wastewater from escaping around the base. They fail gradually through compression and chemical exposure, often going unnoticed until significant damage occurs.
Understanding these failure patterns helps you stock the right preventive replacement parts before problems strand you mid-trip.
How to Choose the Right Camper Toilet Parts
Selecting compatible parts seems straightforward until you realize that “Dometic 300 series” encompasses a dozen different models with subtle variations. Follow these steps to ensure you’re ordering exactly what you need.
Step 1: Identify Your Exact Toilet Model
Locate your toilet’s data plate, typically found on the back or base of the unit. Write down the complete model number—not just “Dometic 300” but the full designation like “Dometic 300 Ceramic Bowl with Hand Flush.” This specificity prevents ordering the wrong water valve configuration.
Step 2: Assess Your Climate Conditions
Operating temperatures dramatically impact component selection. Full-time RVers in northern climates absolutely need freeze-resistant valves and seals. Standard components can crack when water freezes inside the valve body, causing complete failure when temperatures rise. Conversely, southern campers focus on heat-resistant seals that won’t degrade under prolonged sun exposure.
Step 3: Consider OEM vs. Aftermarket Options
Genuine manufacturer parts guarantee perfect fit and typically offer the highest quality standards. However, premium aftermarket brands like Beech Lane and Vypart now engineer improvements over original designs—better freeze resistance, stronger materials, enhanced sealing technology. Reading detailed customer reviews reveals real-world performance that specification sheets miss.
Step 4: Evaluate Installation Complexity
Be honest about your mechanical aptitude. Simple seal replacements require minimal tools and skills, while complete valve assembly swaps might involve multiple components and precise alignment. Many part listings include installation difficulty ratings. If you’re uncertain, buying the more comprehensive kit (even if pricier) often saves frustration compared to discovering you’re missing essential components mid-install.
Step 5: Stock Strategic Spare Parts
Experienced RVers maintain a small inventory of critical replacement parts. Water valves, flush seals, and floor flange seals weigh little and occupy minimal space. Having them aboard means you can execute repairs immediately rather than hunting for parts in unfamiliar towns or waiting for shipping to a campground.
Installation Tips for Camper Toilet Parts
Even straightforward part replacements benefit from proper technique and preparation. Here’s what I’ve learned from both successful installs and instructive mistakes over years of RV ownership.
Essential Tools and Supplies
Before starting any toilet repair, gather these basics: adjustable wrench, Phillips screwdriver, needle-nose pliers, bucket, rubber gloves, paper towels, and white vinegar for cleaning old seals. A headlamp beats holding a flashlight in your teeth every single time. Most importantly, turn off your water pump and relieve system pressure before disconnecting anything.
Water Valve Replacement Walkthrough
Start by closing your black tank valve and draining any water from the toilet bowl. Disconnect the water supply line—expect residual water, hence the bucket positioning. The existing valve typically secures with screws or a locking collar. Remove these fasteners, extract the old valve, and carefully clean the mounting area of mineral deposits using vinegar on a cloth.
The new valve should slide into position easily; forcing it suggests misalignment or incompatible parts. Hand-tighten fasteners initially, then snug them with your wrench—overtightening cracks plastic housings. Reconnect water supply, pressurize the system, and flush several times while inspecting for leaks. A few drips during initial flushes often seal themselves as components seat properly, but persistent leaking means disassembly and rechecking.
Seal Replacement Best Practices
Flush ball seal installation seems foolproof until you realize the seal can orient several ways, only one of which prevents leaks. The thicker lip typically faces upward toward the bowl. Remove the old seal completely—bits of degraded rubber interfere with the new seal’s performance. Wipe the valve body clean and dry before pressing the new seal firmly into its groove. Test by filling the bowl and watching for water level drops over 30 minutes.
Floor flange seals require toilet removal—a two-person job on most RVs due to tight spaces and awkward angles. After unbolting and lifting the toilet away, you’ll see the flange seal (and possibly years of accumulated grime). Scrape away old seal material thoroughly, then press the new seal onto the floor flange, ensuring even compression around the entire circumference. When lowering the toilet back into position, align the bolt holes carefully to avoid seal displacement.
Maintenance Schedule for Longevity
Proper maintenance extends part lifespan significantly and prevents inconvenient mid-trip failures. I’ve developed a schedule that balances thoroughness with practical time constraints.
Monthly Tasks (For Active RVers)
Check water valve operation by listening during flush cycles—smooth, consistent flow indicates good health. Inspect visible seals for cracks or compression. Add a cup of water to empty toilet bowls before extended storage periods; this prevents seal drying and cracking.
Quarterly Maintenance
Deep clean the toilet bowl and flush valve assembly. Remove mineral buildup with vinegar or RV-specific cleaners (never harsh household chemicals that damage rubber seals). Lubricate the blade valve mechanism with silicone spray—petroleum-based lubricants degrade rubber components. Verify floor bolts remain tight but not overtightened.
Annual Comprehensive Service
Remove and inspect the flush ball seal even if functioning normally. Replace seals showing any compression, hardening, or surface cracks. Examine water supply lines for brittleness or bulging, replacing questionable hoses preemptively. Consider preventive water valve replacement every 3-5 years regardless of apparent condition—valves hide internal wear until sudden failure.
This proactive approach has saved me from emergency repairs in remote locations multiple times. The modest investment in preventive parts pales compared to campground plumber rates or lost vacation days.
Common Problems and Solutions
Despite your best maintenance efforts, camper toilet parts eventually develop issues. Recognizing symptoms early minimizes damage and simplifies repairs.
Problem: Toilet Won’t Hold Water in Bowl
Diagnosis: The flush ball seal has likely failed. A functioning seal maintains several inches of water in the bowl; when it fails, water slowly drains into the holding tank. Sometimes you’ll also notice sewage odors since the water barrier no longer blocks gases.
Solution: Replace the 385311658 seal (for Dometic) or equivalent Thetford seal. This typically resolves the issue immediately. If water still drains after seal replacement, the valve seat may be damaged, requiring complete valve assembly replacement.
Problem: Continuous Water Flow After Flushing
Diagnosis: The water valve isn’t closing properly. This wastes fresh water and fills your black tank unnecessarily. Causes include mineral deposits preventing valve closure, damaged valve seals, or broken valve springs.
Solution: First attempt cleaning the valve mechanism. Disassemble per manufacturer instructions and soak components in white vinegar to dissolve minerals. If cleaning doesn’t restore function, replace the entire water valve assembly. Don’t delay—continuous flow can overflow your black tank with potentially disastrous results.
Problem: Weak Flush Pressure
Diagnosis: Multiple culprits create this symptom: clogged water valve filter screens, kinked supply line, or partially failed water pump. The problem might also stem from low water pressure in pedal-flush models.
Solution: Check filter screens first—these mesh screens catch sediment but clog over time. Remove and rinse them under running water. Inspect the water supply line from pump to toilet for sharp bends that restrict flow. If pressure remains weak, your water pump may need service or replacement. For macerating toilets, weak flush often indicates impeller wear requiring professional service.
Problem: Leaking Around Toilet Base
Diagnosis: This serious issue indicates floor flange seal failure. Water (or worse) seeping around the toilet base damages flooring and threatens structural components. It may also signal loose mounting bolts or cracked flange.
Solution: Immediately stop using that toilet if possible. Tighten mounting bolts to see if leaking stops, but don’t overtighten—you’ll crack the porcelain base. If tightening doesn’t help, remove the toilet and replace the floor flange seal. While you have access, inspect the flange itself for cracks or damage requiring more extensive repair.
Winterization and Seasonal Storage
Protecting camper toilet parts during off-season storage prevents expensive freeze damage and premature wear. I learned these lessons through unfortunate experience with cracked components.
Freeze Protection Essentials
Water expands approximately 9% when freezing, generating sufficient force to crack valve bodies, split supply lines, and damage seals. Even “empty” components retain residual water in valve chambers and seal grooves. The solution involves complete winterization using RV-rated antifreeze.
After draining your fresh water system, pump RV antifreeze through every water line until pink fluid emerges from each faucet. For toilets, flush antifreeze through the bowl into the black tank until you see it in the bowl. Leave several cups of antifreeze in the bowl to protect the flush valve and seals. This procedure protects components down to approximately -50°F, depending on antifreeze concentration.
Summer Storage Considerations
Heat and UV exposure present different challenges. Direct sunlight degrades rubber seals through oxidation and UV damage, causing brittleness and premature failure. If possible, park with your bathroom side away from intense afternoon sun. Cover exterior toilet service compartments with reflective covers.
Maintain slight moisture in seals during long storage periods. Completely dry seals develop cracks as rubber compounds lose elasticity. Monthly, add a cup of water (or diluted RV seal conditioner) to toilet bowls. This keeps seals hydrated without creating stagnant water problems.
Budget vs. Premium Parts: What’s Worth It?
The camper toilet parts market spans from bargain-basement components to premium engineered solutions. Understanding where to economize and where to invest saves money long-term.
When Premium Parts Justify Higher Cost
Water valves represent the heart of your toilet system and merit quality investment. Premium valves like the Beech Lane Upgraded Kit cost only $10-15 more than budget options but deliver significantly better freeze resistance and longevity. The engineering improvements—ultrasonic sealing, glass fiber reinforcement—translate to reliable operation through temperature extremes and years of pressure cycling.
Similarly, genuine OEM seals outperform cheap aftermarket alternatives despite 50% higher cost. The rubber compounds in Dometic and Thetford OEM seals resist chemical degradation from holding tank treatments better than generic versions. A $12 OEM seal lasting four years beats a $7 generic requiring replacement every 18 months.
Safe Areas for Budget Shopping
Basic mounting hardware—bolts, washers, hose clamps—rarely justifies premium pricing. As long as the components meet size and thread specifications, standard hardware store versions perform identically to name-brand packages. Floor flange seals also show minimal performance difference between economy and premium options, assuming both specify compatible materials (EPDM or similar synthetic rubber).
The Hidden Cost of Failure
Consider replacement difficulty when evaluating part costs. An $8 flush seal that fails during a two-week national park tour might cost you days of rental RV fees or hotel stays—suddenly that $15 premium seal seems brilliantly economical. Parts requiring toilet removal for installation (floor seals, mounting hardware) especially merit reliable components; you definitely don’t want to repeat that labor six months later.
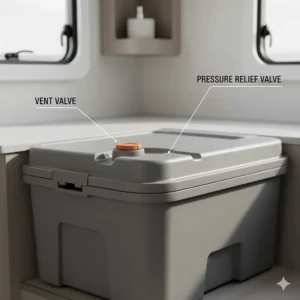
Portable Toilets as Backup Systems
Even meticulously maintained camper toilets occasionally fail at inconvenient moments. Smart RVers carry portable toilets as insurance policies against plumbing catastrophes.
Capacity Considerations
Portable toilets range from compact 2.6-gallon models to substantial 6+ gallon units. Larger capacities mean fewer dump cycles but increased weight when full and greater storage space requirements. For couples weekend camping, 5-6 gallon models offer the sweet spot—sufficient capacity for a full weekend without excessive size.
Flush count claims (100+, 120+) assume minimal water use per flush. Real-world usage typically achieves 60-75% of advertised capacity. Plan accordingly when calculating how long a portable toilet serves your group.
Features That Matter
Level indicators prevent the unpleasant surprise of discovering your waste tank filled overnight. The gauge provides visual warning to plan dump station visits. Rotating pour spouts with splash guards transform emptying from disgusting ordeal to merely unpleasant task—a meaningful distinction after your first portable toilet dump.
T-type flush nozzles clean bowl surfaces more thoroughly than single-jet designs, reducing chemical usage and odor buildup. The difference becomes obvious after several days’ use. Finally, adequate sealing mechanisms prevent odor escape and accidental spills during transport. Check customer reviews specifically mentioning seal effectiveness; this feature varies significantly between brands.
Environmental Considerations
Responsible RV toilet maintenance extends beyond personal convenience to environmental stewardship. According to EPA regulations, proper waste disposal protects water resources and public health.
Eco-Friendly Holding Tank Treatments
Traditional formaldehyde-based treatments kill bacteria indiscriminately, harming septic systems when you dump at facilities using septic processing. Modern enzyme-based treatments break down waste naturally without environmental impact. Products like Aqua-Kem Natural or Camco TST Ultra-Concentrate work effectively while remaining septic-safe.
Responsible Dumping Practices
Always use designated dump stations or approved sewer connections—never dump gray or black water on the ground. Even in seemingly remote areas, waste pollutes groundwater and soil. Many national forests and BLM lands prohibit any waste disposal beyond pack-it-out systems. Plan your trips to include dump station access; apps like Allstays and RV Parky identify facilities along your route.
Water Conservation
Though modern camper toilet parts require less water than ever, conscious usage stretches your fresh water supply and minimizes black tank filling. Teach family members to use minimal water for flushing. Some RVers adopt the “if it’s yellow, let it mellow” approach during dry camping. Each gallon saved means extended boondocking capability and reduced environmental impact from waste processing facilities.
Troubleshooting Advanced Issues
Some toilet problems resist simple part replacement, requiring diagnostic investigation to identify root causes.
Persistent Odor Despite New Seals
Fresh seals should eliminate sewage odors, yet sometimes smells persist. The issue often lies not with the toilet but with the holding tank vent system. Clogged or damaged vent pipes trap gases in the tank, forcing them through the toilet instead of safely venting outside. Inspect roof vent caps for debris or insect nests. Check vent lines for kinks or separations.
Another culprit: biofilm buildup on tank walls. This slimy bacterial coating produces hydrogen sulfide gas even with quality holding tank treatments. Solution involves periodic deep cleaning with specialized products like Unique Tank Cleaner or performing the “ice cube method”—filling the tank partially with ice cubes and driving winding roads to mechanically scrub walls.
Crack in Toilet Bowl or Base
Cracks occasionally develop from impact (dropped items), overtightened mounting bolts, or thermal stress. Hairline cracks in porcelain or plastic often seal temporarily with marine epoxy, but this represents a temporary fix. Structural cracks require complete toilet replacement—repair attempts risk catastrophic failure at highly inconvenient moments.
When selecting replacement toilets, carefully measure your available space. RV toilets come in various heights (low profile, standard, high profile) and footprints. Bringing a toilet home only to discover it won’t fit the existing opening creates major headaches. Photograph your current installation before shopping.
Electrical Issues (For Electric Flush Systems)
Some higher-end RVs feature electric-flush toilets. These systems introduce additional failure modes: failed solenoid valves, broken flush switches, or wiring problems. Basic electrical testing with a multimeter helps isolate issues. Check for 12V power at the toilet when flush button depresses. If voltage exists but toilet doesn’t flush, the solenoid likely failed; if no voltage appears, trace wiring back to the control panel or investigate the flush switch.
Electric toilets often require manufacturer-specific parts. Generic replacements rarely work, so maintain good records of exact model numbers for ordering. Many RVers keep spare solenoids and flush switches due to extended lead times from manufacturers.
Upgrading Your RV Bathroom
Beyond replacement parts, several upgrade options enhance your camper bathroom experience significantly.
Bidet Attachments
The Clean Camper Original RV Bidet connects to your RV’s water line, providing adjustable spray pressure for superior hygiene and reduced toilet paper usage. This dual-nozzle, self-cleaning system installs without electricity and works with most standard RV toilets. At roughly $60-80, it represents modest investment for substantially improved comfort.
High-Profile Toilet Conversions
Swapping a low-profile or standard-height toilet for a high-profile model (taller by 2-4 inches) reduces strain on knees and hips, especially for older RVers or those with mobility challenges. This upgrade typically requires minimal modification since toilets mount to standard floor flanges. Measure vertical clearance carefully—some RV bathrooms have limited space between toilet mounting position and bathroom ceiling or cabinets.
Tank Monitoring Systems
Traditional holding tank sensors notoriously malfunction due to waste coating probe tips. Modern wireless monitoring systems like LevelMatePRO use ultrasonic technology to measure tank levels from outside the RV, eliminating false readings. They cost $100-150 but provide accurate monitoring that helps prevent both overfilling and unnecessary dump runs.
Expert Shopping Tips
Having replaced dozens of camper toilet parts across multiple RVs, I’ve developed a strategic approach to sourcing components that maximizes value while ensuring reliability.
Online vs. RV Specialty Stores
Amazon and RVupgradestore offer extensive selections and competitive pricing, typically 20-40% below physical RV stores. However, specialty retailers provide expertise—staff who can verify compatibility and recommend solutions based on experience. For straightforward replacements (matching part numbers exactly), online shopping makes sense. For troubleshooting unusual problems or first-time repairs, knowledgeable retail staff earns their margin.
Timing Purchases for Best Prices
RV part pricing fluctuates seasonally. Late fall through winter (November-February) brings deepest discounts as retailers clear inventory before new model year parts arrive. Spring (peak RV season) typically sees higher prices and potential stock shortages. If you know which parts your toilet requires, stock up during off-season sales.
Reading Between Review Lines
Online reviews require critical evaluation. Verified purchase badges indicate actual user experience rather than promotional content. Look for reviews specifically mentioning your toilet model—”works great on my Dometic 310″ carries more weight than vague praise. Multiple mentions of the same issue (difficult installation, premature failure) warrant attention even if the overall rating seems positive.
Conversely, individual negative reviews among hundreds of positives may reflect installation errors rather than part defects. Reading several reviews provides balanced perspective on realistic expectations.
Future Trends in RV Toilet Technology
The camper toilet parts industry continues evolving, with several innovations emerging that will shape future RV bathroom design and maintenance.
Composting Toilet Integration
Waterless composting toilets like Nature’s Head and Separett reduce holding tank concerns entirely. These systems separate liquids from solids, using carbon-based composting media to break down waste naturally. While initial costs run $900-1200, the elimination of black tank maintenance and dump station visits appeals to boondockers and full-time RVers. Expect more affordable options as technology matures.
Smart Sensors and Connectivity
Bluetooth-connected monitoring systems now track not just tank levels but also flush counts, water usage patterns, and maintenance schedules. These systems send smartphone alerts when tanks need dumping or parts approach expected service intervals. As component costs decrease, integration into standard RV builds will increase, moving from luxury feature to expected amenity.
Advanced Materials
Manufacturers increasingly specify high-performance polymers that withstand freeze-thaw cycles better than traditional plastics while maintaining affordability. Graphene-enhanced rubber seals promise extended service life through superior chemical and temperature resistance. These improvements filter down from commercial aviation and marine applications where component reliability justifies premium material costs.
Reduced Water Consumption
Next-generation RV toilets aim for 0.5 gallons or less per flush compared to current 1-2 gallon norms. Improved bowl designs, higher-pressure flush systems, and specialized coatings that prevent waste adhesion enable this reduction. Less water per flush extends freshwater supply and reduces black tank filling rates—critical advantages for off-grid camping.
FAQ
❓ How often should I replace my RV toilet water valve?
❓ Can I use regular household toilet parts in my camper toilet?
❓ What's the difference between Dometic and Thetford toilet parts?
❓ How do I know when my toilet seal needs replacement?
❓ Are aftermarket RV toilet parts as good as OEM?
Conclusion
Maintaining camper toilet parts represents one of those unglamorous RV ownership responsibilities that directly impacts your quality of life on the road. The seven products highlighted in this guide—from the reliable Dometic 385311641 Water Valve Kit to the innovative Kohree Portable Toilet—provide solutions for virtually every RV bathroom challenge.
Smart RVers adopt a proactive approach: inspecting components regularly, replacing parts before complete failure, and maintaining a small inventory of critical spares. This strategy prevents the disappointment of cancelled trips due to toilet malfunctions and saves money compared to emergency repairs at inflated campground prices.
Remember that proper installation matters as much as quality parts. Take time to clean mounting surfaces thoroughly, follow torque specifications, and test thoroughly after installation. When in doubt, consult manufacturer documentation or seek guidance from experienced RVers in online communities.
Your RV bathroom should enhance your camping experience, not become a source of stress and inconvenience. With quality parts, proper maintenance, and the knowledge shared in this guide, you’re equipped to keep your camper toilet system functioning flawlessly for years of adventures ahead. Safe travels!
Recommended for You
- 7 Best Camper Shower Faucet 2025 (Expert-Tested & Reviewed)
- 7 Best Hitches for a Camper 2025 | Top Expert Picks
- 7 Best Camper Ceiling Fans for 2025: Cool Your Rig Right
Disclaimer: This article contains affiliate links. If you purchase products through these links, we may earn a small commission at no additional cost to you.
✨ Found this helpful? Share it with your friends! 💬🤗