In This Article
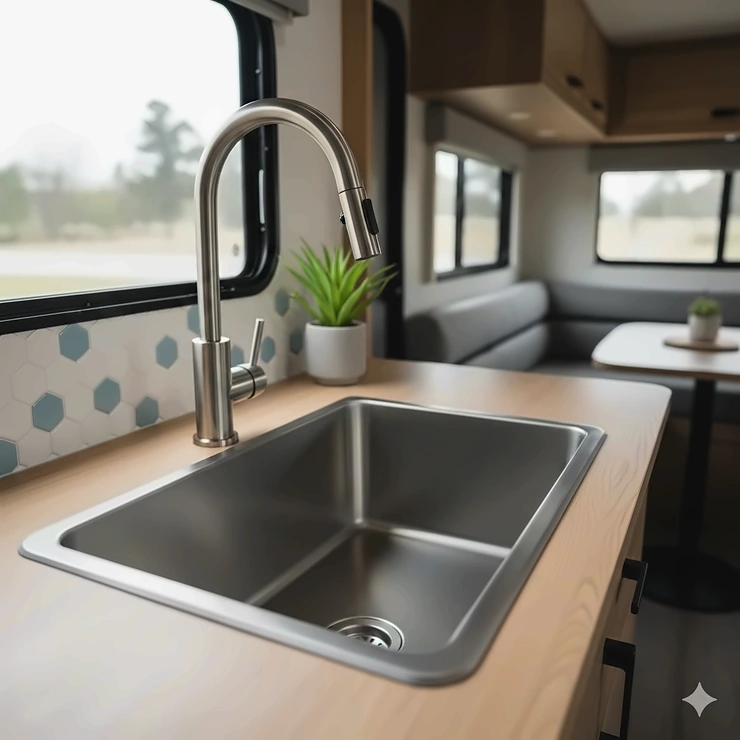
Picture this: you’re miles away from civilization, parked under starlit skies, ready to whip up dinner in your cozy RV kitchen—only to realize your sink is too shallow, cracked, or just plain annoying to work with. Sound familiar? If you’ve ever struggled with a subpar camper trailer kitchen sinks setup, you’re not alone. Your RV’s sink is arguably the hardest-working component in your mobile kitchen, handling everything from dishwashing to food prep, yet it’s often the most overlooked upgrade.

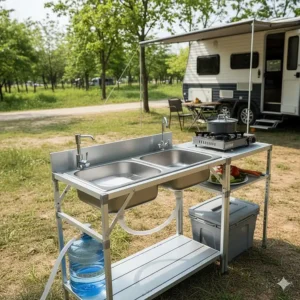
The right camper trailer kitchen sinks can transform your entire RV living experience. Whether you’re a full-time van lifer cooking gourmet meals on the road or a weekend warrior who just needs a reliable basin for cleanup, choosing the perfect sink involves balancing space constraints, material durability, and functionality. Modern camper trailer kitchen sinks have evolved far beyond the flimsy plastic basins of yesteryear. Today’s options include space-saving folding designs, double-bowl configurations, premium stainless steel constructions, and even innovative combo units that merge sinks with cooking surfaces.
In this comprehensive guide, we’ll explore seven top-rated camper trailer kitchen sinks for 2025, covering budget-friendly picks to premium workstation models. You’ll discover critical factors like material comparison, installation types, sizing considerations, and maintenance requirements. By the end, you’ll know exactly which sink matches your RV lifestyle and how to install it like a pro.
Quick Comparison Table
| Sink Model | Material | Size | Price Range | Best For | Rating |
|---|---|---|---|---|---|
| YIYIBYUS Folding Sink with Faucet | 304 Stainless Steel | 16.7″ x 14.7″ | $80-$120 | Space-conscious RVers | ⭐⭐⭐⭐ 4.2/5 |
| Lippert RV Single Kitchen Galley Sink | ABS Acrylic | 25″ x 17″ x 6.6″ | $90-$150 | Budget-friendly upgrade | ⭐⭐⭐⭐ 4.0/5 |
| RecPro Double Bowl Stainless Sink | 22-Gauge Stainless | 27″ x 16″ x 7″ | $110-$170 | Multi-taskers | ⭐⭐⭐⭐ 4.3/5 |
| Folding RV Sink & Faucet Combo | 304 Stainless Steel | 15″ x 17″ | $95-$135 | Compact kitchens | ⭐⭐⭐⭐ 4.1/5 |
| GZOII Portable RV Sink | Stainless Steel | 16.54″ x 14.57″ | $75-$115 | Travel trailers | ⭐⭐⭐⭐ 4.0/5 |
| RecPro 10″ x 13″ Oval Sink | Stainless Steel | 10″ x 13″ x 5.25″ | $60-$95 | Bathroom/bar setups | ⭐⭐⭐⭐ 4.2/5 |
| Getanye Square Single Bowl | 304 Stainless Steel | 16.5″ x 14.3″ | $85-$125 | Modern aesthetics | ⭐⭐⭐⭐ 4.3/5 |
💬 Just one click – help others make better buying decisions too! 😊
Top 7 Camper Trailer Kitchen Sinks: Expert Analysis
1. YIYIBYUS Stainless Steel RV Sink with Folding Faucet & Tempered Glass Lid
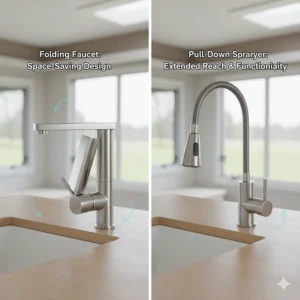
The YIYIBYUS Folding Sink emerges as a game-changer for space-starved RVers who refuse to compromise on functionality. This ingenious design features a 360-degree rotating faucet that folds completely flat, allowing the tempered glass lid to close seamlessly—effectively giving you bonus counter space when the sink isn’t in use.
Key Specifications:
- Dimensions: 16.7″ L x 14.7″ W x 5.9″ H
- Material: 304 stainless steel with tempered glass lid
- Faucet: Hot/cold capability with hidden bubbler
Price Range: $80-$120 (varies by retailer and seasonal sales)
Customer Feedback: Users rave about the clever space-saving design, with many noting how the glass lid transforms into additional prep space. The 304-grade stainless steel resists rust and maintains its shine even after months of heavy use. Some buyers mentioned installation requires careful measurements, but the included full hardware kit simplifies the process.
Pros:
✅ Folding faucet doesn’t interfere with lid closure
✅ Tempered glass provides extra workspace
✅ Corrosion-resistant 304 stainless steel construction
Cons:
❌ Requires precise cutout measurements
❌ Glass lid may show fingerprints easily
This sink shines for weekend warriors and full-timers alike who need maximum versatility in minimal square footage.
2. Lippert RV Single Kitchen Galley Sink (25″ x 17″ x 6.6″)
Lippert RV Single Kitchen Galley Sink represents the sweet spot between affordability and quality. Manufactured by industry leader Lippert Components, this ABS acrylic sink weighs 20-25% less than fiberglass alternatives while maintaining impressive scratch resistance.
Key Specifications:
- Dimensions: 25″ x 17″ x 6.6″
- Material: Scratch-resistant ABS acrylic
- Configuration: Single bowl, drop-in mount
Price Range: $90-$150
Customer Feedback: RV owners appreciate the lightweight construction that simplifies installation without sacrificing durability. The integrated channel grooves prevent water pooling and deter mildew growth—a clever engineering touch. Several reviewers noted the stainless steel color finish looks remarkably authentic.
Pros:
✅ 20-25% lighter than fiberglass equivalents
✅ Built to withstand vibrations and temperature fluctuations
✅ Channel grooves prevent standing water
Cons:
❌ Not genuine stainless steel (acrylic finish)
❌ Faucet sold separately
Perfect for RVers upgrading from cracked plastic sinks who want proven durability without breaking the bank.
3. RecPro RV Double Bowl Kitchen Sink (27″ x 16″ x 7″)
For multitaskers who demand efficiency, the RecPro Double Bowl Sink delivers dual basins in a compact footprint. Constructed from 22-gauge 304 stainless steel, this sink handles heavy-duty use while maintaining a professional appearance.
Key Specifications:
- Dimensions: 27″ x 16″ x 7″
- Material: 22-gauge 304 stainless steel
- Configuration: Equal double bowls
Price Range: $110-$170
Customer Feedback: Owners love the ability to separate food prep from cleanup tasks. The 3-1/2″ diameter sink holes fit standard drains, eliminating compatibility headaches. Some users wished for deeper bowls, but most agree the trade-off enables true double-basin functionality in tight quarters.
Pros:
✅ Separate basins for washing and rinsing
✅ Non-porous surface resists bacteria growth
✅ Fits standard drain sizes (3-1/2″)
Cons:
❌ Requires larger countertop cutout
❌ Slightly heavier than single-bowl alternatives
Ideal for couples or families who cook elaborate meals and need organized dishwashing workflow.
4. Folding RV Sink & Faucet Combo (15″ x 17″)
This Folding RV Sink Combo takes space optimization seriously with its undermount/drop-in versatility and comprehensive accessory package. The Type B 360-degree rotating faucet features a hidden bubbler that filters impurities while preventing splashing.
Key Specifications:
- Dimensions: 15″ x 17″ (compact workstation size)
- Material: 304 stainless steel with tempered glass lid
- Included: Sink, faucet, hoses, drain pipe, full installation kit
Price Range: $95-$135
Customer Feedback: Buyers praise the all-inclusive package that eliminates the frustration of sourcing compatible components separately. The folding lid concept earns consistent five-star reviews for transforming sink space into usable countertop. A few customers noted the faucet’s plastic construction versus the sink’s metal body.
Pros:
✅ Complete package (sink, faucet, installation hardware)
✅ Dual mounting options (undermount or drop-in)
✅ Cold and hot water capability
Cons:
❌ Smaller capacity than standard sinks
❌ May require professional plumbing for hot water connection
Best suited for solo travelers or couples prioritizing workspace flexibility over basin size.
5. GZOII Portable RV Sink (16.54″ x 14.57″ x 5.91″)
The GZOII Portable RV Sink combines portability with permanence, featuring a folding faucet and protective tempered glass cover. Its brushed stainless steel finish resists fingerprints while the compact dimensions fit awkward spaces.
Key Specifications:
- Dimensions: 16.54″ x 14.57″ x 5.91″
- Material: Brushed stainless steel
- Special Features: Foldable faucet, glass cover
Price Range: $75-$115
Customer Feedback: Users highlight the exceptional value proposition, noting this sink delivers premium features at a mid-tier price point. The folding faucet received particular acclaim for its smooth operation and leak-free seal. Some mentioned the drain assembly could be more robust.
Pros:
✅ Excellent price-to-feature ratio
✅ Brushed finish minimizes visible wear
✅ Tempered glass cover doubles as cutting surface
Cons:
❌ Basic drain assembly
❌ Limited depth for larger cookware
An outstanding choice for budget-minded travelers seeking modern amenities without premium pricing.
6. RecPro 10″ x 13″ Stainless Steel Oval Sink
Don’t let the compact dimensions fool you—the RecPro Oval Sink packs impressive functionality into its petite 10″ x 13″ footprint. This single-bowl design works brilliantly as a secondary prep sink, bathroom basin, or bar setup.
Key Specifications:
- Dimensions: 10″ x 13″ x 5.25″ deep
- Material: Stainless steel with brushed nickel finish
- Drain: 1.5″ diameter hole
Price Range: $60-$95
Customer Feedback: Reviewers frequently mention this sink’s versatility—it transitions seamlessly from bathroom duty to bar prep to outdoor cooking station. The rust and stain resistance holds up well, though a few users experienced issues with lower-grade stainless steel that developed surface rust in marine environments.
Pros:
✅ Ultra-compact footprint for tight spaces
✅ Rust and stain-resistant construction
✅ Affordable entry point
Cons:
❌ Some quality control inconsistencies reported
❌ Shallow depth limits large-item washing
Perfect as a supplementary sink for RVs with bathroom renovations or outdoor kitchen additions.
7. Getanye Square Single Bowl RV Sink (16.5″ x 14.3″)
The Getanye Square Sink rounds out our list with a sophisticated design that includes an integrated folding faucet and square configuration. The cold/hot faucet capability and modern aesthetic appeal to RVers seeking upscale finishes.
Key Specifications:
- Dimensions: 16.5″D x 14.3″W x 6.3″H
- Material: 304 stainless steel
- Configuration: Single bowl with folding lid
Price Range: $85-$125
Customer Feedback: Owners appreciate the square shape that maximizes basin volume while minimizing countertop intrusion. The folding lid mechanism operates smoothly even after extended use. Some customers wished for clearer installation instructions, though the sink’s quality compensates for documentation gaps.
Pros:
✅ Square design optimizes interior space
✅ Premium 304 stainless steel construction
✅ Integrated hot/cold water faucet
Cons:
❌ Installation instructions could be more detailed
❌ Higher price point than basic models
Excellent for RVers who prioritize aesthetics and are willing to invest in long-term quality.
🎯 Don’t Miss These Exclusive Deals!
🔍 Take your RV kitchen to the next level with these carefully selected camper trailer kitchen sinks. Click on any highlighted product name to check current pricing and availability. These sinks will help you create functional workspace and efficiency your family will love while traveling!
Understanding Camper Trailer Kitchen Sinks Materials
The Material Matters: A Deep Dive
The material you choose for your camper trailer kitchen sinks directly impacts durability, weight, maintenance requirements, and aesthetics. Let’s break down the four primary options available in 2025.
Stainless Steel: The Road Warrior’s Choice
Stainless steel dominates the RV sink market for compelling reasons. Specifically, 304-grade stainless steel offers superior corrosion resistance, making it ideal for the humid conditions often encountered in RV living. The non-porous surface prevents bacterial growth—a critical consideration when your kitchen doubles as your food safety zone.
According to research on RV sink materials, stainless steel sinks withstand constant vibrations, jarring, and temperature fluctuations better than alternative materials. The gauge matters significantly: lower numbers indicate thicker, more durable steel. Look for 18-22 gauge construction for optimal longevity.
Key Advantages:
- Rust and stain resistant for years of reliable service
- Easy to sanitize with simple soap and water
- Reflects kitchen lighting, enhancing visual spaciousness
- Retains resale value when selling your RV
Potential Drawbacks:
- Can show water spots if not dried properly
- May develop scratches from abrasive scrubbers
- Slightly heavier than plastic or acrylic alternatives
ABS Acrylic: The Budget-Friendly Performer
ABS acrylic strikes a balance between affordability and functionality. Manufacturers like Lippert favor this material because it’s 20-25% lighter than fiberglass while maintaining scratch resistance. The molded construction allows for integrated features like channel grooves that prevent water pooling.
ABS acrylic handles temperature fluctuations gracefully—important when you’re parking in Arizona summers and Colorado winters. The material won’t crack easily under stress, unlike cheap plastic alternatives that fail spectacularly at the worst moments.
Key Advantages:
- Lighter weight simplifies DIY installation
- More affordable than stainless steel options
- Good scratch resistance for daily use
- Available in multiple color finishes
Potential Drawbacks:
- Can discolor over time with hard water
- Not as premium-looking as genuine stainless steel
- May retain odors if not cleaned regularly
Plastic: The Original Standard (Proceed with Caution)
Many entry-level RVs come equipped with basic plastic sinks. While these keep manufacturing costs down, they’re the least durable option for camper trailer kitchen sinks. The constant movement inherent in RV travel causes plastic to crack, especially around mounting points and drain holes.
Plastic sinks scratch easily, creating grooves where bacteria can hide. They also lack the heat resistance needed for dumping hot pasta water or washing scorching pans. If your RV currently has a plastic sink, upgrading should top your renovation priority list.
Solid Surface (Corian): The Premium Option
High-end RVs sometimes feature solid surface sinks made from materials like Corian. These non-porous surfaces combine 2/3 natural minerals with 1/3 acrylic polymer, creating a premium appearance with excellent durability. The seamless integration with countertops provides a luxurious aesthetic.
However, solid surface sinks carry a premium price tag and require professional installation for that perfect seamless look. They’re heavier than acrylic but offer superior scratch resistance that can be buffed out when wear appears.
Installation Types: Drop-In vs. Undermount vs. Integrated
Drop-In Sinks: The DIY Darling
Drop-in (top-mount) sinks remain the most popular choice for camper trailer kitchen sinks due to their installation simplicity. The sink’s lip rests on the countertop, supported by its own rim. This design forgives minor imperfections in your cutout and requires no specialized mounting hardware beyond basic clips.
Installation Process Overview:
- Create template from manufacturer specifications
- Cut countertop opening carefully
- Apply silicone sealant around rim
- Lower sink into opening
- Secure with mounting clips underneath
- Connect plumbing and test for leaks
The elevated rim does collect debris, requiring occasional cleaning. But for weekend warriors tackling their first RV renovation, drop-in sinks offer the lowest barrier to entry.
Undermount Sinks: The Sleek Sophisticate
Undermount installation creates that seamless, professional appearance found in luxury motorhomes. The sink mounts beneath the countertop, allowing you to sweep crumbs and debris directly into the basin without encountering a raised lip.
This method maximizes usable counter space—precious real estate in compact RV kitchens. However, undermount sinks demand more precise installation and typically require solid surface countertops or reinforced laminate. The extra counter space gained makes the additional effort worthwhile for serious RV renovators.
Integrated Countertop Sinks: The Modern Marvel
Some custom RV builders opt for integrated sink-countertop units where the basin flows seamlessly from the surrounding work surface. These one-piece installations eliminate seams where water and grime accumulate, creating the ultimate in easy-clean functionality.
The downsides? Replacing just the sink requires replacing the entire countertop. These units also command premium pricing. Consider integrated designs if you’re building a custom van conversion from scratch rather than upgrading an existing RV.
Sizing Your Camper Trailer Kitchen Sinks Perfectly
Measure Twice, Install Once
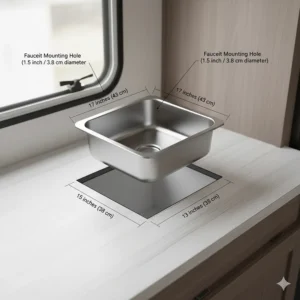
The golden rule of RV sink replacement: measure your existing cutout meticulously before shopping. Most camper trailer kitchen sinks fall within standard size ranges, but manufacturers introduce enough variation to cause headaches if you don’t verify dimensions.
Critical Measurements to Record:
- Overall sink dimensions (length x width x depth)
- Cutout opening size (actual hole in countertop)
- Rim width (if replacing drop-in sink)
- Cabinet interior space (ensure sink fits underneath)
- Faucet hole spacing (typically 4″ or 8″ on center)
According to professional RV renovation guides, standard RV kitchen sinks measure approximately 14-11/16″ x 14-11/16″, though larger models extend to 27″ x 16″ for double-bowl configurations.
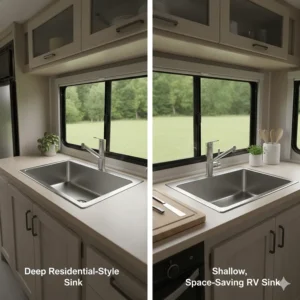
Depth Considerations: The Overlooked Dimension
Sink depth dramatically affects usability yet often gets ignored during the selection process. Shallow basins (5″ or less) make washing large pots frustrating as water splashes everywhere. Deeper sinks (7″+ depth) accommodate tall items comfortably but may conflict with undercounter storage or plumbing clearances.
Measure the vertical space available between your countertop underside and any obstacles (water heater, storage bins, plumbing). Leave at least 2″ clearance beyond the sink bottom for drain assembly and potential repairs.
Counter Space Trade-Offs
Larger camper trailer kitchen sinks obviously provide more workspace for food prep and dishwashing. But in the zero-sum game of RV kitchen design, every inch devoted to the basin subtracts from counter space for cutting, mixing, and other tasks.
Consider your actual usage patterns. Do you frequently cook elaborate meals requiring extensive prep space? Or do you mostly reheat and clean up? Solo travelers might prioritize counter workspace over sink size, while families benefit from larger basins that handle higher dish volumes.
Installation Guide: How to Install Camper Trailer Kitchen Sinks
Tools and Materials Checklist
Before starting your sink replacement project, gather these essentials:
Tools Required:
- Jigsaw with fine-tooth blade
- Drill with 1/4″ bit
- Adjustable wrench
- Silicone sealant (clear or color-matched)
- Putty knife
- Level
- Tape measure
- Safety glasses
Materials Needed:
- New sink (obviously!)
- Mounting clips and hardware
- Plumber’s putty or silicone
- Drain assembly (if not included)
- Flexible water supply lines
- Teflon tape for threaded connections
Step-by-Step Installation Process
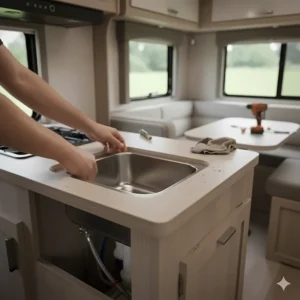
Phase 1: Preparation and Removal
Turn off your RV’s water pump and disconnect from city water. Open faucets to relieve line pressure. Disconnect the existing sink’s water supply lines and drain assembly, placing a bucket underneath to catch residual water.
Remove old mounting clips from beneath the countertop. Carefully cut through any silicone sealing the sink to the counter using a utility knife. Lift out the old sink and thoroughly clean the countertop surface, removing all old sealant residue.
Phase 2: Template and Cutting (if needed)
If your new sink’s footprint matches the existing cutout, skip ahead to Phase 3. Otherwise, create a cutting template from cardboard or paper following the manufacturer’s specifications. Position the template carefully, ensuring adequate rim support all around.
Drill starter holes at each corner of your cutting line. Insert your jigsaw blade and cut slowly, supporting the cutout piece to prevent binding. Sand edges smooth and test-fit your new sink before proceeding.
Phase 3: Sealing and Installation
Apply a continuous bead of silicone sealant around the underside of the sink rim (for drop-in models) or around the cutout edge (for undermount installations). Lower the sink carefully into position, pressing firmly to spread the sealant evenly.
Attach mounting clips underneath the countertop, working in a star pattern to ensure even pressure. Tighten gradually—over-tightening can crack acrylic sinks or warp stainless steel. Wipe away excess sealant squeeze-out with a damp cloth.
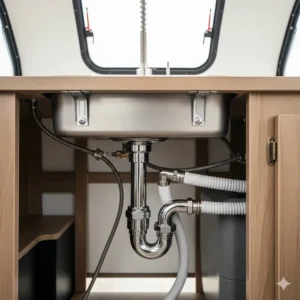
Phase 4: Plumbing Connections
Install the drain assembly according to manufacturer instructions, using plumber’s putty around the drain flange. Connect flexible water supply lines to faucet inlets, wrapping threads with Teflon tape for leak prevention.
Restore water pressure gradually and check all connections for leaks. Run water for several minutes, inspecting underneath with a flashlight. Tighten connections as needed and wipe away any water spots.
Pro Installation Tips
Allow silicone sealant to cure for 24 hours before using the sink heavily. This patience prevents seal failure that leads to water damage beneath your countertop. If you encounter stubborn leaks around the drain assembly, ensure the rubber gasket hasn’t twisted during installation.
For RVers uncomfortable with plumbing work, any licensed plumber can install camper trailer kitchen sinks. The job typically takes 2-3 hours including removal, installation, and cleanup. Professional installation runs $150-$300 depending on complexity and your location.
Maintenance Tips for Long-Lasting Performance
Daily Care Routine
Your camper trailer kitchen sinks will maintain their appearance and functionality for years with minimal daily attention. After each use, rinse thoroughly with clean water to prevent food particles and mineral buildup. Wipe dry with a microfiber cloth—this simple habit prevents water spots on stainless steel and mineral staining on acrylic.
Avoid leaving wet sponges or dishcloths in the basin overnight. The moisture creates an ideal environment for mildew growth, especially in RVs stored in humid climates. Store cleaning supplies in a separate container with adequate ventilation.
Deep Cleaning Best Practices
For Stainless Steel Sinks:
Create a paste using baking soda and water, applying it with a soft nylon scrub brush in the direction of the steel’s grain. Never use steel wool or abrasive pads—these create scratches that harbor bacteria and ruin the finish.
For stubborn water spots, spray undiluted white vinegar and let sit for 5 minutes before rinsing thoroughly. Dry completely with a clean towel. Optional finishing touch: buff with a few drops of olive oil on a soft cloth to restore luster.
For ABS Acrylic Sinks:
Gentle cleaners work best on acrylic camper trailer kitchen sinks. Use dish soap and warm water for regular cleaning, avoiding harsh chemicals that can dull the finish. For stains, make a paste of baking soda and water, let it sit for 10 minutes, then rinse.
Magic Eraser-style melamine foam pads remove scuffs effectively but use sparingly as they’re mildly abrasive. Always test in an inconspicuous area first.
Preventing Common Issues
Drain Clogs: Install mesh drain screens to catch food particles before they enter your grey tank. Once weekly, flush drains with boiling water to dissolve grease buildup. For RVers with hard water, quarterly treatments with RV-safe drain cleaners prevent mineral accumulation.
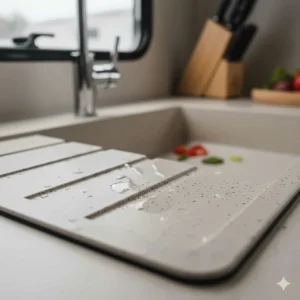
Scratches and Scuffs: Place protective mats in the sink basin when washing pots and pans. The silicone or plastic barriers prevent cookware from abrading your sink’s surface directly.
Odor Control: Baking soda neutralizes odors naturally. Sprinkle a handful down the drain, follow with hot water, and your grey tank won’t develop that characteristic RV smell. For persistent odors, commercial RV holding tank treatments address the source.
Cost Analysis: Budget vs. Premium Camper Trailer Kitchen Sinks
| Price Tier | Cost Range | What You Get | Best For |
|---|---|---|---|
| Budget | $60-$100 | Basic stainless or acrylic, limited accessories, standard installation | Weekend RVers, temporary solutions |
| Mid-Range | $100-$150 | Quality materials, some premium features (folding faucets, glass lids), complete installation kits | Regular travelers, balanced value seekers |
| Premium | $150-$250+ | 304 stainless steel, dual-bowl configurations, workstation features, comprehensive warranties | Full-timers, serious upgraders |
The Total Cost of Ownership
When budgeting for camper trailer kitchen sinks, factor in these additional expenses beyond the sink itself:
Installation Materials: $20-$50
- Silicone sealant, plumber’s putty, Teflon tape, mounting hardware
Faucet (if not included): $40-$200
- Basic models start around $40, pulldown sprayer faucets reach $150+
Drain Assembly: $15-$40
- Required if your new sink uses different drain sizes
Professional Installation (optional): $150-$300
- Worth considering for complex undermount installations
Total Project Cost Range: $245-$840 depending on choices
When to Splurge vs. Save
Splurge if you:
- Live in your RV full-time and use the kitchen daily
- Plan to keep your RV for 5+ years
- Cook elaborate meals requiring serious workspace
- Want features like double basins or integrated cutting boards
Save if you:
- Use your RV for occasional weekend trips
- Plan to upgrade or sell your RV within 2-3 years
- Primarily eat out or use simple meal prep
- Have limited DIY skills and want easy installation
The sweet spot for most RVers falls in the $100-$150 mid-range category, where you access quality materials and useful features without overpaying for luxury extras you won’t use.
Troubleshooting Common Problems
Issue #1: Persistent Leaks Around Drain
Symptoms: Water pooling under sink, grey tank filling unexpectedly
Likely Causes: Worn drain gasket, loose locknut, cracked drain body
Solution: Tighten the drain locknut from underneath using channel-lock pliers. If leaking persists, disassemble the drain completely and replace the rubber gasket. Apply fresh plumber’s putty around the drain flange before reassembly. Ensure the drain body hasn’t cracked—common with over-tightened plastic drains.
Issue #2: Water Pooling on Countertop
Symptoms: Standing water around sink rim after use
Likely Causes: Inadequate silicone seal, uneven sink installation
Solution: Remove the sink and inspect the silicone bead. It should form a continuous, unbroken seal all around. Reapply silicone evenly, ensuring no gaps. Use a level to verify the sink sits flat—shims underneath mounting clips can correct minor unevenness in your countertop.
Issue #3: Scratches and Surface Damage
Symptoms: Visible scratches on stainless steel, dull finish on acrylic
Prevention: Use cutting boards, avoid abrasive cleaners, install sink grid
Solution: For stainless steel, buff light scratches with specialized stainless steel polish, working in the direction of the grain. Deeper gouges may be permanent. For acrylic, automotive plastic polish can restore some luster to dulled areas. Consider this normal wear-and-tear that adds character to well-loved RV kitchens.
Issue #4: Slow Draining Sink
Symptoms: Water backs up slowly, gurgling sounds
Likely Causes: Partial clog in drain line, venting issues, grey tank nearly full
Solution: Check your grey tank level first—RV drains slow dramatically as tanks approach capacity. If the tank has room, remove the drain assembly and clear any visible debris. Snake the drain line with a flexible auger. For persistent issues, inspect the vent system—blocked vents prevent proper drainage.
Frequently Asked Questions
❓ How deep should camper trailer kitchen sinks be for practical use?
❓ Can I use household kitchen sinks instead of RV-specific camper trailer kitchen sinks?
❓ What gauge stainless steel works best for camper trailer kitchen sinks?
❓ How do I prevent mold and mildew in my camper trailer kitchen sinks?
❓ Are folding faucets on camper trailer kitchen sinks reliable long-term?
Conclusion: Finding Your Perfect Camper Trailer Kitchen Sinks Match
Selecting the right camper trailer kitchen sinks transforms your RV kitchen from a frustrating chore zone into an efficient, enjoyable workspace. Throughout this guide, we’ve explored seven exceptional sinks ranging from budget-conscious RecPro models to premium workstation designs, each offering unique advantages for different RV lifestyles.
The standout themes? Material matters tremendously—304 stainless steel delivers unmatched longevity while ABS acrylic provides excellent value for occasional users. Installation type impacts both aesthetics and difficulty, with drop-in sinks favoring DIYers and undermount options creating that luxurious, seamless appearance. Size considerations demand careful measurement and honest assessment of your actual kitchen workflow.
For most RVers, we recommend starting with the mid-range options ($100-$150) that balance quality construction, useful features like folding faucets or glass lids, and manageable installation complexity. The YIYIBYUS Folding Sink and RecPro Double Bowl models exemplify this sweet spot, offering features you’ll use daily without unnecessary expense.
Remember that your sink choice ripples through your entire RV experience. A well-selected sink makes meal prep enjoyable, cleanup efficient, and your mobile kitchen a space you’re proud to use. Whether you’re a weekend warrior seeking simple reliability or a full-timer demanding professional-grade performance, the perfect camper trailer kitchen sinks await in our expertly curated selection.
Ready to upgrade your RV kitchen? Start by measuring your current setup, identifying your must-have features, and selecting from our top seven recommendations. Your future self—standing at a beautiful, functional sink while parked in some breathtaking location—will thank you for investing in this crucial upgrade.
Recommended for You
- 7 Best Camper Toilet Parts You Need in 2025
- 7 Best Camper Shower Faucet 2025 (Expert-Tested & Reviewed)
- 7 Best Hitches for a Camper 2025 | Top Expert Picks
Disclaimer: This article contains affiliate links. If you purchase products through these links, we may earn a small commission at no additional cost to you.
✨ Found this helpful? Share it with your friends! 💬🤗