In This Article
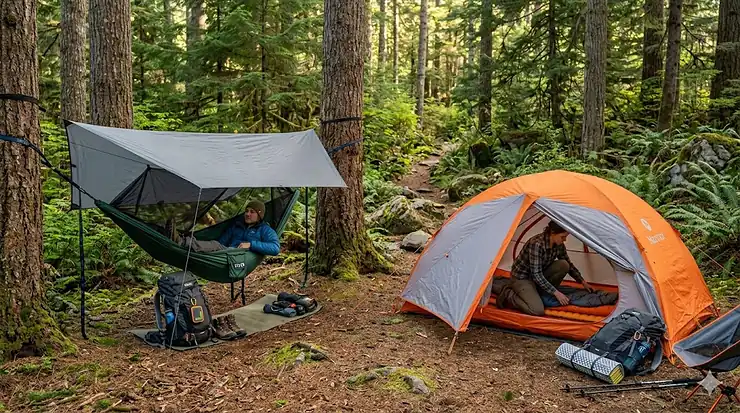
You’ve got a weekend free. The forecast looks almost perfect — 68°F, partly cloudy, light breeze. You’ve done the research, you’ve got the gear lust, but you’re still standing in your garage staring at a hammock in one hand and a tent stuff sack in the other, genuinely unsure which one deserves the coveted spot in your 40-liter pack.
This is the hammock vs tent camping comparison everyone eventually has to make.
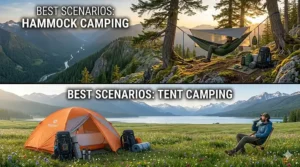
And here’s the thing most buying guides won’t admit: there’s no universal right answer. What there is, though, is a very specific right answer for you — based on where you’re going, how you sleep, and what kind of camper you’re trying to become. The hammock vs tent decision is more nuanced than it looks from the outside. Hammocks dangle gloriously between two trees and promise weightless slumber, but they’ll leave you freezing in October if you don’t plan for it. Tents are battle-tested shelters that work almost anywhere on earth, but they demand flat ground and add real ounces to your back.
Over the course of this guide, I’ve researched 7 real, currently available products — 4 hammocks and 3 tents — and built out a genuine comparison framework to help you figure out which shelter style fits your actual life. Whether you’re a weekend warrior making your first solo trip into the Smoky Mountains, a thru-hiker counting every gram on a PCT section, or a family of four who just wants everyone to sleep in comfort, this hammock vs tent camping comparison has your answer.
According to Leave No Trace, proper campsite selection is one of the cornerstones of responsible outdoor recreation — and that choice often determines whether a hammock even works for your trip. We’ll get into that too.
Quick Comparison: Hammock Camping vs Tent Camping at a Glance
| Factor | Hammock Camping | Tent Camping |
|---|---|---|
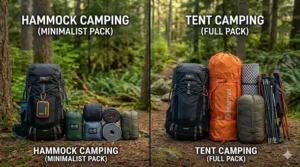
| Weight (solo setup) | 1–2 lbs (hammock + straps) | 2–4 lbs (typical UL tent) |
| Setup Time | 3–8 minutes (with practice) | 5–15 minutes |
| Site Requirements | 2 trees, 12–15 ft apart | Flat, clear ground |
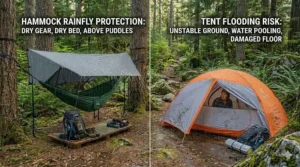
| Weather Protection | Needs tarp + insulation layer | Built-in rain fly, floor |
| Cold Weather Use | Challenging (requires underquilt) | Superior |
| Back/Side Sleepers | Learning curve (diagonal lay) | Familiar & flat |
| Versatility | Wooded trails, off-trail | Beaches, deserts, alpine |
| Cost to Start | $50–$150 (hammock only) | $150–$600 (quality UL) |
| Best For | Solo, warm-season, wooded | Families, 4-season, universal |
Looking at this table, the key takeaway is that hammocks absolutely win on weight and immersive experience in wooded settings, while tents dominate in versatility, cold-weather capability, and family use. Neither is objectively superior — but one is almost certainly better for the specific trip you’re planning.
💬 Just one click — help others make better buying decisions too! 😊
Top 7 Hammocks & Tents for 2026: Expert Analysis
Whether you’re team hammock or team tent, the gear you choose makes an enormous difference in how your nights actually feel. Here are seven products that are currently available on Amazon, each earning their spot for a specific type of camper.
1. ENO DoubleNest Hammock — The Gold Standard for a Reason
The ENO DoubleNest is genuinely the hammock that converted a generation of tent campers. If you’ve seen someone strung up between two hemlocks looking unreasonably relaxed, there’s a good chance they’re in a DoubleNest.
Made from 70-denier high-tenacity nylon with a 400-lb weight capacity, the DoubleNest packs down to the size of a softball — impressively small for a shelter that comfortably fits one adult with room to spread out, or two cozy campers. The fabric is noticeably thicker than cheaper competitors, which translates to a hammock that doesn’t feel like it’s one bad move away from dumping you headfirst into the dirt. ENO also builds these from 100% recycled materials as of their latest production run, which matters to a growing number of outdoor-minded buyers.
What most buyers overlook: the DoubleNest hangs fast. We’re talking 3 minutes flat once you know what you’re doing. Pair it with ENO’s Atlas or Helios suspension straps (sold separately, in the $30–$40 range) and you’ve got a complete system that protects trees and adjusts in seconds. The DoubleNest alone runs in the $60–$80 range, which makes it one of the best value-per-night pieces of gear in the outdoor market.
Customer feedback is overwhelmingly positive, with reviewers consistently praising the packability and build quality. The most common complaint? The DoubleNest doesn’t include straps, so beginners may not realize they need to budget extra for a suspension system.
✅ Ultracompact stuff sack — fits in any pack corner
✅ 400-lb capacity — genuinely confidence-inspiring
✅ Huge color selection and gifting-friendly price point
❌ No straps included — add $30–$40 to get started
❌ Nylon fabric can feel chilly without an underquilt below 60°F
Best for: Day hikers who want lunchtime lounging as much as overnight camping, and anyone making their first foray into hammock life.

2. Kammok Roo Double Hammock — The One for Couples (and Size Queens)
The Kammok Roo Double is what you choose when you’re done apologizing for wanting space. At 11 feet long and woven from Kammok’s proprietary Dynatex ripstop nylon, the Roo Double is engineered for two people or one very comfortable solo sleeper who demands elbow room.
The 500-lb combined weight capacity is reassuring, and the Dynatex fabric has a noticeably silkier feel than standard parachute nylon — this is the difference between sleeping and sleeping. Kammok also builds the Roo Double to be compatible with their Python Straps, which are wider than most competitors (20mm vs the standard 16mm) and distribute force across a broader swath of bark. That’s not just tree-hugger ethics — it’s actually better for long-term suspension stability on your hang.
The price puts it in the $80–$110 range, a step up from budget options. But the upgrade in fabric quality and sheer size makes the premium feel earned rather than arbitrary.
Reviewers frequently call it the “nicest hammock I’ve ever owned” — and the consistent praise for the Dynatex fabric suggests Kammok nailed their material choice. The main gripe is that straps are, again, sold separately, and Kammok’s own Python Straps aren’t cheap.
✅ Enormous sleeping surface — genuinely fits two adults
✅ Premium Dynatex fabric — smoother and more durable than standard nylon
✅ Wider straps protect trees better than most systems
❌ Python Straps add $50+ to the total system cost
❌ Larger packed size than single hammocks
Best for: Couples, larger adults, or anyone who’s tried a cramped single hammock and wants to never do that again.
3. Grand Trunk Ultralight Starter Hammock — The Honest Budget Pick
Let’s be real: most people don’t need to spend $200 on their first hammock. The Grand Trunk Ultralight Starter Hammock exists precisely to prove that point, and it does it admirably.
Weighing just 12 ounces and made from King Rhombic ripstop polyester (a step stiffer than nylon but more durable for its weight class), the Grand Trunk Ultralight fits a 300-lb capacity into a package that costs roughly $30–$50. Yes, really. The fabric is stiffer than the ENO DoubleNest or Kammok Roo, which means it’s less immediately comfortable — but it’s also more resistant to snags and abrasion, which matters if you’re camping in brushy terrain.
What the spec sheet won’t tell you: this hammock rewards a proper diagonal lay more than any other budget option I’ve tested. Get the angle right, and the stiffer fabric actually helps flatten out your sleeping surface. Get it wrong, and you’ll wake up feeling like a human banana. There’s a learning curve here, but it’s a forgiving one at this price.
Grand Trunk has earned a 4.5-star average on Amazon across thousands of reviews. Occasional complaints about the carabiner clips (S-hooks rather than locking carabiners) are valid — swap them for aluminum locking biners for about $8 and the system becomes significantly more confidence-inspiring.
✅ Incredible value — entry-level price, real-world durability
✅ Ultralight for its price tier
✅ Works with most standard suspension systems
❌ Stiffer fabric than premium options
❌ S-hook clips are the weakest link in an otherwise solid package
Best for: First-timers, kids, or budget-conscious campers testing hammock life before committing to a pricier kit.
4. Grand Trunk Skeeter Beeter Pro — When the Bugs Win Without It
If you’ve camped anywhere near a lake, a river valley, or basically any Southern trail between May and September, you already know: bugs aren’t an inconvenience. They’re a campaign. The Grand Trunk Skeeter Beeter Pro is built for that reality.
The Skeeter Beeter Pro integrates a full no-see-um mesh canopy directly into the hammock body. You hang it, unzip, climb in, and you’re sealed inside a bug-free floating fortress. What makes it clever is the reversible design — when you don’t need the net, flip it over and it functions as a standard hammock. That’s two use cases for one piece of gear, which is the backpacker’s version of getting away with something.
Weight capacity sits at 300 lbs, and the hammock itself is made from breathable nylon that handles humid conditions better than tightly woven alternatives. The price range lands $60–$90 — a bit more than a bare hammock, but dramatically cheaper than buying a separate bug net and rigging it yourself.
The catch — and it’s a real one — is that this kit doesn’t include a rainfly or suspension straps. For true hammock camping (as opposed to backyard lounging), you’ll want to budget an additional $30–$60 for straps and a tarp. Still, the integrated mosquito protection alone is worth the price of admission for Gulf Coast, Pacific Northwest, or Appalachian camping.
✅ No-see-um mesh keeps even the tiniest invaders out
✅ Reversible design works with or without the net deployed
✅ Built-in protection saves weight vs. carrying a separate net system
❌ No suspension straps or rainfly included
❌ Heavier than bare hammocks due to the integrated net
Best for: Campers in buggy environments — humid forests, lakesides, Southern Appalachian trails — where bug protection is non-negotiable.
5. Hennessy Hammock Expedition Asym Zip — The All-in-One That Changed Everything
If the previous four hammocks are ingredients, the Hennessy Expedition Asym Zip is the finished meal. This is the hammock system that proved you can sleep exclusively in a hammock through an entire season — and it’s priced to make that commitment accessible.
The Expedition Asym Zip ships as a complete kit: asymmetric hammock body, integrated bug net, and a tarp, all in one package. The asymmetric cut is the key innovation — by offsetting your body angle relative to the hammock’s centerline, Hennessy engineered a flatter, more back-friendly sleeping position that eliminates most of the “banana hang” problem that plagues cheaper hammocks. The entry is through a bottom zip rather than a roll-in, which takes getting used to but creates a more secure cocoon once you’re settled.
At roughly $170–$230 for the full kit, it undercuts almost every comparable all-in-one system on the market. You will still need suspension straps (two tent stakes are the only other requirement listed by Hennessy — they’ve thought of essentially everything else). CleverHiker’s 2026 review specifically calls out the Expedition’s “excellent value proposition” for new hammock campers.
Customer feedback praises the all-in-one convenience and the effectiveness of the bug protection. The main criticism: the bottom-entry system can feel awkward until you’ve practiced it a few times, and the asymmetric design takes longer to optimize than a standard hang.
✅ Genuine complete system — tarp and bug net included
✅ Asymmetric design promotes flatter, back-friendlier sleeping
✅ Extraordinary value vs. buying components separately
❌ Bottom-entry learning curve frustrates some first-time users
❌ Heavier than ultralight bare hammocks at 43.9 oz total
Best for: Campers who want to commit to hammock sleeping without sourcing a tarp, net, and hammock separately. Ideal for beginners who value a complete, coherent system.
6. Big Agnes Copper Spur UL2 — The Tent That Converts Hammock Skeptics
Here’s a tent that genuinely earns its reputation rather than coasting on brand recognition. The Big Agnes Copper Spur UL2 weighs just 3 lbs, packs into a compact stuff sack, and delivers a two-person interior with two vestibules and two doors — a feature combination you simply don’t find at this weight in the tent market.
The color-coded pole attachment system is the kind of design detail that reveals thoughtful engineering. After a long day on trail, the last thing you want is to puzzle out which pole goes where in failing light. Big Agnes solved that. The doors open one-handed, the vestibules offer 17 square feet of combined gear storage, and the interior peak height of 40 inches means you can actually sit up without performing yoga.
The trade-off is material fragility — the ultralight fabrics demand more careful site selection than a bomber car-camping tent. Don’t drag this over sharp granite. But for its intended purpose (3-season backpacking at the front of the weight-savings category), the Copper Spur UL2 sits at $550–$650 and delivers performance that justifies every dollar. GearJunkie’s 2026 field test called it their best overall pick at this price tier.
Customer reviews consistently praise the setup ease and interior livability. The primary complaint: the ultralight construction requires more mindful handling than heavier alternatives.
✅ Industry-leading weight-to-livability ratio
✅ Two-door, two-vestibule design for two people
✅ Color-coded poles make setup intuitive after dark
❌ Premium price tag is a real barrier for occasional campers
❌ Ultralight fabrics require careful use — not a hammers-and-stakes setup
Best for: Dedicated backpackers who want maximum performance in a 3-season tent, and those whose trails involve open alpine terrain where trees — and hammocks — simply aren’t available.
7. MSR Hubba Hubba LT 2 — The Weatherproof Workhorse
The MSR Hubba Hubba LT 2 is what you buy when you’re serious about weather. MSR didn’t mess around with the LT’s weatherproofing — the rainfly delivers 360-degree coverage, ten extra guyline attachment points, and MSR’s Mini Groundhog stakes (legitimately excellent stakes, included in the kit) for a stormworthy setup that punches well above its weight class.
At around 2 lbs 10 oz for the trail weight, the Hubba Hubba LT 2 is in the same ultralight conversation as the Copper Spur, but with a more bomber construction that experienced backpackers trust more in shoulder-season conditions. The non-tapered floor design is an underrated feature — most ultralight tents narrow aggressively toward the feet, creating a coffin-like sleeping space. The Hubba Hubba LT avoids that entirely, giving both occupants real room to maneuver.
Priced in the $550–$700 range, it’s a significant investment. But the value-per-night math works out favorably for anyone who camps more than 20 nights a year. CleverHiker’s 2026 update confirms its position as one of the most durable options in the ultralight category.
Customer reviews particularly praise the storm performance and long-term durability. The occasional criticism centers on condensation management in humid conditions — a common challenge across all double-wall designs.
✅ Outstanding storm protection — more guyline points than most competitors
✅ Non-tapered floor creates genuine two-person livability
✅ MSR Mini Groundhog stakes included — an often-overlooked value add
❌ Premium price requires commitment
❌ Condensation management in humid summer conditions requires active venting
Best for: Backpackers who encounter variable weather, shoulder-season adventurers, and anyone who’s been caught in a storm in an underpowered tent and vowed never again.
✨ Don’t Miss These Exclusive Deals!
Take your camping setup to the next level with these carefully selected products. Click on any highlighted item to check current pricing and availability — these tools will help you create authentic outdoor memories you’ll actually remember.
Your Complete Setup Guide: How to Make Either System Actually Work
Most camping discomfort isn’t about gear quality — it’s about setup mistakes. Here’s what changes everything.
Hammock Setup: The Three Rules You Can’t Skip
Rule 1: The 30-Degree Strap Angle Your straps should form roughly a 30-degree angle from the tree to the hammock end. Too steep and you create enormous lateral force on the trees (and your end loops). Too shallow and the hammock sags into a deep curve that makes flat sleeping impossible. Use a phone level app if you’re uncertain — it sounds fussy but it takes 10 seconds and makes a measurable difference.
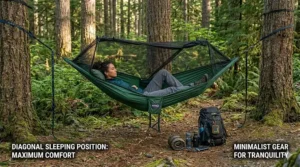
Rule 2: The Diagonal Lay This is the secret that separates comfortable hammock campers from frustrated ones. Shift your body to a 20-30 degree diagonal from the centerline of the hammock. Your head goes toward one corner, feet toward the other. This relieves the banana-curve tension and creates a dramatically flatter sleeping surface. Practice this at home before you ever hit the trail.
Rule 3: The Underquilt Is Not Optional Below 55°F Cold air circulates under a hammock in a way that a sleeping bag’s compressed fill can’t compensate for. Without an underquilt — a dedicated insulating layer that hangs beneath the hammock body — you will be cold. This isn’t opinion; it’s heat transfer physics. Budget $60–$150 for a quality underquilt before your first cool-weather hang.
Tent Setup: Common First-Night Mistakes
Stake the fly first. In a hammering rainstorm at midnight, you want the fly providing cover while you finish the interior setup. Practice this sequence before your trip so it’s muscle memory.
Identify drainage before dark. The single biggest tent camping mistake is pitching in a subtle depression that collects water. Walk your campsite before committing to a spot, especially in any terrain where rain is possible.
Leave the vestibule organized. Wet gear left inside the tent body kills sleep quality. Develop a system: boots and rain gear always in the vestibule, sleeping system always in the main body. Consistency matters more than any individual gear choice.
Real Campers, Real Decisions: Which Setup Matches Your Story?
The Weekend Warrior: Jake, 34, Appalachian Trail Section Hiker
Jake hikes the AT in 4–5 day sections, starting in late April and finishing before November. His section runs through dense hardwood forest from Virginia to North Carolina — virtually never above treeline, never above a reasonable hammock hang. He’s an above-average sleeper who just wants to wake up without back pain.
Verdict for Jake: Hammock. The Hennessy Expedition Asym Zip is the complete kit he needs. The asymmetric design solves his back pain, the included tarp handles AT weather, and the bug net is non-negotiable in mid-summer Appalachian conditions.
The Desert Rat: Maria, 28, Utah Canyon Country Regular
Maria spends her weekends in slot canyons, mesa country, and canyon floors where the aesthetic is pure red rock — and trees are a foreign concept. She loves the Southwest’s climate and camps 3-season.
Verdict for Maria: Tent. The Big Agnes Copper Spur UL2 is ideal. No trees, no hammock. The ultralight design fits her fastpacking aesthetic, and the two vestibules handle the sandy, windy conditions of canyon country better than most competitors.
The Duo: Sam & Chris, 30s, Smokies Regulars
Sam and Chris camp together 2–3 weekends per month in the Smoky Mountains. They want to sleep together comfortably, manage heat and humidity, and not fight over gear weight.
Verdict for Sam & Chris: Split system. One sleeps in the Kammok Roo Double (there’s genuinely room for two on cool nights), and the other carries a single hammock for solo hangs. On bug-heavy nights, one deploys the Grand Trunk Skeeter Beeter while the other uses a standard hammock with a separate net.
How to Choose Between Hammock and Tent: 6 Decision-Making Criteria
Making the hammock vs tent decision isn’t complicated once you answer six honest questions about your camping reality.
1. Does your terrain have trees? This is the only truly binary question in the entire comparison. No trees — or trees spaced beyond 15 feet with no intermediary options — means no hammock. If you regularly camp above treeline, in desert environments, or at open meadow sites, a tent is your only viable option. Check your intended campsite via satellite imagery (Google Maps satellite view works perfectly) before every trip.
2. What temperature range will you encounter? Hammocks lose thermal efficiency rapidly below 55°F unless you invest in an underquilt system. A complete cold-weather hammock kit (hammock + straps + underquilt + tarp) can actually weigh more than an equivalent UL tent. Below 40°F, tents win unambiguously. The REI Camping Guide suggests always sleeping 10°F warmer than the expected low when selecting sleep systems — good advice for both hammocks and tents.
3. How do you naturally sleep? Back sleepers adapt to hammocks quickly. Side sleepers need more practice, particularly in getting the diagonal angle right. Stomach sleepers — and this is an honest assessment — almost never find hammocks comfortable for overnight use. Know yourself before you commit.
4. Are you camping solo or with others? Solo: hammocks are genuinely superior in wooded terrain. The weight savings, comfort ceiling, and setup speed all favor a well-chosen hammock over an equivalent UL tent. Couples: hammocks can work (the Kammok Roo Double is proof), but a tent gives you more sleeping configuration flexibility. Families with kids: tent, full stop. Hammocks don’t scale for group camping.
5. How much gear do you carry? Hammock sleepers have no floor. Your pack, food bag, and clothing all live outside the hammock body during sleep. If you’re carrying substantial gear, a tent’s enclosed floor space offers real organizational advantages that you’ll miss after a few hammock nights.
6. Is Leave No Trace compliance important to you? Both setups can be used sustainably, but hammock camping requires proper tree straps (1-inch minimum width) and health-conscious tree selection to avoid bark damage. The Leave No Trace Center specifies minimizing impact on campsites — and a properly rigged hammock leaves essentially no trace, while a poorly hung one can damage trees.
7 x 7 Product Comparison Table
| Product | Type | Weight | Capacity | Price Range | Best For |
|---|---|---|---|---|---|
| ENO DoubleNest | Hammock | 19 oz | 400 lbs | $60–$80 | All-around value, first hammock |
| Kammok Roo Double | Hammock | 20 oz | 500 lbs | $80–$110 | Couples, larger adults |
| Grand Trunk Ultralight | Hammock | 12 oz | 300 lbs | $30–$50 | Budget beginners |
| Grand Trunk Skeeter Beeter Pro | Hammock + Bug Net | 22 oz | 300 lbs | $60–$90 | Buggy environments |
| Hennessy Expedition Asym Zip | Hammock Kit | 43.9 oz | 250 lbs | $170–$230 | Complete hammock newcomers |
| Big Agnes Copper Spur UL2 | Tent | 3 lbs | 2 person | $550–$650 | Weight-obsessed backpackers |
| MSR Hubba Hubba LT 2 | Tent | 2 lbs 10 oz | 2 person | $550–$700 | Stormy conditions, durability |
Analyzing this spread: if your primary constraint is budget, the Grand Trunk Ultralight gets you into hammock camping for under $50. If weather capability is the priority, the MSR Hubba Hubba LT 2 is simply the most storm-ready shelter in this lineup. The Hennessy Expedition Asym Zip occupies a fascinating middle ground — it’s heavier than a bare hammock but delivers a completeness that saves first-timers from the accessory rabbit hole.
What the Marketing Doesn’t Say: Features That Matter vs. Those That Don’t
The outdoor gear industry is extraordinarily good at marketing. Here’s what to actually evaluate vs. what to safely ignore.
Features That Actually Move the Needle
For Hammocks:
- Fabric denier (D rating): 70D is the sweet spot for durability and weight. Under 40D tears more easily on rough bark; over 70D adds weight without commensurate strength gain.
- End loop construction: Double-stitched, reinforced end loops are what hold your full bodyweight. This is where cheap hammocks cut corners. Look for sewn structural loops, not knotted rope.
- Strap width: 1-inch minimum width to comply with Leave No Trace guidelines. Narrower straps concentrate force and damage tree bark.
For Tents:
- Hydrostatic head (HH) rating: A rainfly rated at 1500mm HH is the bare minimum for reliable rain protection. Quality backpacking tents run 1500–3000mm. Under 1500mm? Leave it on the shelf.
- Vestibule volume: Often undersold in marketing, vestibule space determines how comfortably you can gear-organize in a storm. The MSR Hubba Hubba and Big Agnes Copper Spur both prioritize this.
- Pole-to-corner connection quality: This is where expensive tents justify their cost. Premium DAC poles with color-coded connectors dramatically reduce setup time and failure points.
Features That Don’t Matter As Much As Advertised
- Hammock “comfort ratings” in marketing materials — sleep comfort in a hammock is 80% technique and 20% hammock. A $40 Grand Trunk properly hung beats a $200 hammock in a banana curve every time.
- Tent “3-season” vs “4-season” labeling — most marketed 4-season tents are overkill for anything below sub-alpine winter use. Unless you’re genuinely mountaineering, a quality 3-season tent with a comprehensive stake-out system handles 95% of conditions.
- Exact weight to the gram — a 10-gram weight difference between two similar products is irrelevant in the field. Focus on the 200–500 gram differences between categories.
Long-Term Cost & Total Value Analysis
Hammock Camping: The True Cost of Starting Right
Starting hammock cost (bare minimum): $40–$80 (hammock + budget straps) Full functional system: $120–$200 (hammock + quality straps + tarp + bug net) Cold-weather upgrade: $60–$150 (underquilt) Full 3-season kit: $180–$350 for a quality setup
The Hennessy Expedition Asym Zip at $170–$230 delivers the most value per dollar for someone starting from zero, because the tarp and bug net are included. Buying those separately from budget sources adds $60–$100 to any bare hammock.
Tent Camping: Budget vs. Investment Tiers
Budget 3-season (REI Trail Hut 2 level): $150–$250 — functional, heavier, acceptable for car camping and light trail use Mid-range (Big Agnes Blacktail 2 level): $250–$400 — meaningful weight reduction, better materials Premium (Big Agnes Copper Spur UL2, MSR Hubba Hubba LT): $500–$700 — genuine ultralight territory, field-tested reliability
The premium tents have a genuine 10–15-year lifespan with proper care. Amortized over 100+ nights of use, that’s $5–$7 per night — competitive with any lodging option and frankly, a better experience than most.
According to a University of Michigan study on nature exposure, even short time spent in natural settings measurably reduces cortisol levels and improves mental health outcomes. The specific shelter you use matters far less than simply going. Buy the gear that removes barriers to getting out, not the gear that intimidates you into staying home.
Hammock Camping Mistakes That Ruin Your First Night
Mistake 1: Hanging too high. Most beginners hang their hammock too high above the ground — partly from the instinct that higher = safer. The opposite is true. Hang your hammock so the middle sits 18 inches above the ground when you’re lying in it. A fall from 18 inches is a bruise; a fall from 6 feet is an emergency.
Mistake 2: Ignoring the weather window. Hammocks without tarps are backyard equipment, not camping equipment. Any rain that hits the top of your exposed hammock will wick through the fabric and soak you within an hour. Bring a silnylon or Dyneema tarp every single time, even if the forecast looks perfect. Weather in the mountains moves fast.
Mistake 3: Skipping the underquilt conversation until it’s too late. You realize you’re cold in a hammock at 2am on your second night out. By that point, there’s no solution available. Research underquilts before your first trip, not after your first miserable night. Even a budget fleece underquilt adds 15–20°F of functional warmth.
Mistake 4: Choosing trees that are too close together. Trees need to be between 12 and 15 feet apart for a functional hang. Too close and your angle becomes dangerously steep; too far and your suspension straps may not reach. Practice measuring 13 feet in your backyard — it’s further than most people instinctively estimate.
Frequently Asked Questions
❓ Is hammock camping better than tent camping for your back?
❓ Can you hammock camp if there are no trees at the campsite?
❓ What is the weight comparison between a hammock setup and a tent for backpacking?
❓ How cold is too cold for hammock camping?
❓ Is tent or hammock backpacking better for families?
Conclusion: Make the Decision Before You Hit the Trail
Here’s the honest bottom line of this hammock vs tent camping comparison: both systems work beautifully in the right conditions. The hammock camper who’s mastered their diagonal lay and underquilt setup will sleep better than most tent campers on a warm June night in a hardwood forest. The tent camper with a Big Agnes Copper Spur UL2 and a proper site selection strategy will sleep better than any hammock setup in a desert canyon or a 35°F October storm.
The decision framework is actually simple: hammock if you’re going somewhere wooded and warm, tent if you need universal capability. When in doubt, the tent wins on versatility. When you know your terrain, the hammock wins on experience.
If you’re just starting out: the Grand Trunk Ultralight Starter Hammock at $30–$50 gives you the cheapest possible entry to discover if hammock camping suits your sleep style. The ENO DoubleNest at $60–$80 is the upgrade worth making once you know you love it. And if you want everything in one box, the Hennessy Expedition Asym Zip at $170–$230 is the most complete starter kit on the market.
For tent campers unwilling to compromise: the Big Agnes Copper Spur UL2 is the benchmark. The MSR Hubba Hubba LT 2 is what you buy when benchmark-level performance in bad weather matters more than saving 6 ounces.
Go outside. Sleep well. Make the hammock vs tent decision confidently — and then go prove yourself right.
✨ Don’t Miss These Exclusive Deals!
🔍 Ready to upgrade your sleep setup? Click any highlighted product name to check current pricing and availability on Amazon. Your best night’s sleep in the woods is one gear decision away.
Recommended for You
- 7 Best Hammock Straps in 2026: Tree-Friendly & Tested
- Best Hammock Underquilt: 7 Expert Picks for Warm Nights in 2026
- Best Hammock Rain Fly in 2026: 7 Top Picks Reviewed
Disclaimer: This article contains affiliate links. As an Amazon Associate, I earn from qualifying purchases. If you purchase products through these links, we may earn a small commission at no additional cost to you.
✨ Found this helpful? Share it with your friends! 💬🤗