In This Article
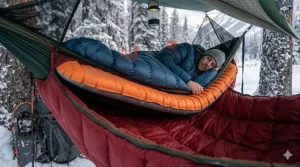
There’s a particular kind of betrayal that happens to first-time winter hammock campers around 2 a.m. You did everything right. Good bag, good site, good weather forecast. And yet you’re lying there wide awake, every nerve ending in your backside screaming, wondering why a “20-degree sleeping bag” has turned into a meat locker. This is not a gear malfunction. This is physics doing exactly what physics does: your body weight is crushing the insulation underneath you into a thin, useless pancake, and the night air is reaching straight through it to steal your heat.
Hammock campers have a name for this. They call it cold butt syndrome, and it’s the single biggest reason people try winter hammock camping once and never again. The fix isn’t a better sleeping bag — it’s understanding that a hammock and a tent solve the insulation problem completely differently, and a winter hammock camping guide that doesn’t start there isn’t worth reading.
This one does. We’re walking through exactly what changes when the mercury drops, then getting specific about seven pieces of gear — hammocks, underquilts, top quilts, and shelter — that are currently sold on Amazon and built to handle it. No theory-only fluff. Real specs, real trade-offs, and an honest read on who each piece is actually for.
What Makes Winter Hammock Camping Different (And Why Your Tent Gear Won’t Cut It)
Winter hammock camping is the practice of sleeping suspended above the ground in cold-weather conditions, which requires dedicated bottom insulation — an underquilt or equivalent — because a hammock offers zero protection from convective heat loss underneath you the way insulated ground compresses do for tent campers.
That’s the whole riddle in one sentence. On the ground, your sleeping pad does the heavy lifting against cold soil, and your bag’s loft (mostly uncompressed on your sides and top) handles the rest. In a hammock, your body weight squashes everything beneath you against thin fabric with open air on the other side — air that, on a still night, is already pulling heat off you, and on a windy night, is doing it at several times the rate — the same wind-chill effect the National Weather Service quantifies for exposed skin applies just as directly to an exposed hammock as it does to a person standing in an open field. According to underquilt manufacturer engineering data, roughly two-thirds of your body heat escapes through the bottom of a hammock, straight through the thin fabric beneath you, and your sleeping bag doesn’t fix that because your body weight crushes the insulation underneath to near-zero thickness.
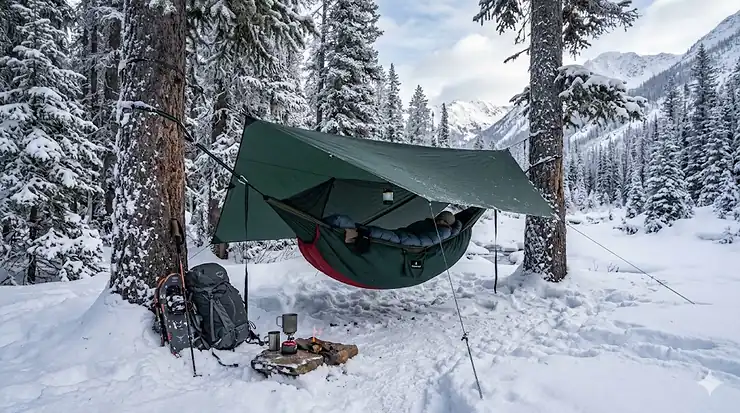
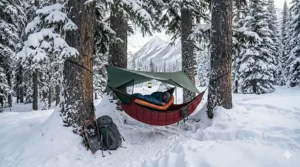
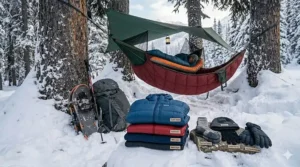
That’s why every genuinely useful winter hammock setup is built around three layers working together: an underquilt hanging loose beneath the hammock body (so it never compresses), a top quilt or sleeping bag on top, and a tarp overhead to cut wind and precipitation. Skip any one of the three below freezing and you’ll find out which one within about an hour.
Quick Comparison: Winter Hammock Gear at a Glance
| Product | Category | Temp Rating | Weight | Best For |
|---|---|---|---|---|
| ENO DoubleNest Hammock | Hammock | N/A (3-season shell) | ~19 oz | The foundation — pairs with any underquilt below |
| ENO Vulcan UnderQuilt | Underquilt | 30–50°F | ~29 oz | Shoulder-season cold, wind-prone sites |
| OneTigris Night Protector (Winter) | Underquilt | 23–41°F | ~42 oz | Budget-conscious true winter use |
| AYAMAYA Underquilt | Underquilt | Rated to 20°F (mfr. claim) | ~2.5–3 lbs | Deep-budget starter, best paired with a bag |
| Go Outfitters Adventure Top Quilt | Top Quilt | To 20°F | ~3 lbs | Roomy, all-position sleepers |
| onewind Top Quilt -35° | Top Quilt | To -35°F | Varies by size | Genuine sub-zero expeditions |
| ENO ProFly Rain Tarp | Tarp/Shelter | N/A | ~22 oz | Wind-blocking and precipitation cover |
A table like this flattens a lot of nuance, so here’s the read: nothing on this list is a complete winter system by itself. The hammock needs an underquilt, the underquilt needs a top quilt or bag on the other side of your body, and the whole rig needs a tarp once temperatures or wind start working against you. If you’re shopping with a single budget in mind, prioritize the underquilt first — it’s doing more work against the cold than any other single piece of gear you’ll buy.
💬 Just one click — help others make better buying decisions too! 😊
Don’t camp cold and uninformed
Before you spend a dollar, it’s worth getting a feel for what “20°F” actually means once wind gets involved — a topic the next few sections dig into, including how to build a system instead of just buying a quilt and hoping.
The 7 Best Winter Hammock Camping Picks — Expert Analysis
1. ENO DoubleNest Hammock
The ENO DoubleNest Hammock is the piece almost everyone in the hammock-camping world eventually owns, and for winter use specifically, that ubiquity matters — it means every underquilt manufacturer designs and sizes their products against it as the default fit. The 9’6″ x 6’4″ body is cut from 70-denier FreeWave nylon with triple-stitched seams, rated to 400 pounds, and it compresses down to roughly the size of a grapefruit, which is the kind of detail that matters a lot less in July and a lot more when you’re trying to fit a hammock, an underquilt, a top quilt, and a tarp into one pack.
What the spec sheet won’t tell you: the DoubleNest’s wide body is a genuine advantage in winter, not just a comfort perk. Extra width means you can lie on a diagonal, which flattens your body angle and reduces the amount of fabric compression directly under your core — a small thing that adds up over an eight-hour night. The fabric itself isn’t insulated at all, which is exactly the point; it’s a stable, breathable shell that’s meant to be paired with bottom insulation, not a substitute for it.
Owner reviews consistently point to the triple-stitch construction holding up across years of seasonal use, and complaints are rare and minor — mostly about color fading after repeated UV exposure, which is a non-issue for anyone using it primarily for fall-through-spring trips. The DoubleNest does not include suspension straps, which trips up a lot of first-time buyers; budget separately for those.
Pros: Compatible with virtually every underquilt on this list · Generous width helps reduce pressure-point cold spots · Genuinely tested long-term durability
Cons: No straps included · Offers zero insulation on its own — easy to forget when you’re excited about the hammock itself
Price tends to land in the $50–$70 range. For the money, it’s hard to find a more proven shell to build a winter system around — check current pricing and availability before you buy, since these numbers shift.
2. ENO Vulcan UnderQuilt
If the DoubleNest is the foundation, the ENO Vulcan UnderQuilt is the piece that actually fights the cold. It uses two offset layers of Primaloft synthetic insulation — a deliberate choice over down, since synthetic fill keeps its loft even if it picks up condensation overnight, which is common in winter when warm, moist air from your body meets a cold quilt shell. It’s rated for 30 to 50 degrees Fahrenheit, with a durable water-repellent 20D ripstop nylon shell designed to handle wind, rain, and general winter weather, and it’s built to fit users up to 6’2″.
In practice, that 30–50°F window means the Vulcan is the quilt for people whose “winter camping” looks like late-fall and early-spring nights in the 30s, not blue-ribbon polar expeditions — and that’s a much bigger slice of the hammock-camping calendar than the marketing copy on most “winter” gear implies. The fully adjustable shock-cord suspension system adapts to most sleeping positions and is compatible with nearly every ENO hammock except the SkyLoft. One long-time owner’s field notes are blunt about the trade-off here: it solved cold-butt syndrome reliably down into the 30s, but for genuine sub-freezing nights, a heavier down underquilt made more sense — which tracks with how most cottage-brand cold-weather guides categorize synthetic underquilts in this temperature band.
Where the Vulcan earns its reputation is wind resistance. The water-repellent coating and offset-quilted construction (which eliminates the cold seams a simpler stitched-through design would leave) make it noticeably more stable in gusty conditions than ultralight summer underquilts pressed into cold-weather service. If your winter trips mean exposed ridgelines and open campsites more than they mean deep snow, that wind performance often matters more than another ten degrees of temperature rating.
Pros: Genuinely wind-resistant shell and coating · Synthetic fill shrugs off overnight condensation · Easy shock-cord setup that adjusts to side-sleeping
Cons: Not rated for true deep winter without a supplemental bag · At 29 oz, heavier than down alternatives at the same rating
Expect to pay in the $110–$140 range, putting it solidly in mid-tier territory — a reasonable trade for synthetic fill’s wet-weather reliability.
3. OneTigris Night Protector Winter UnderQuilt
This is the underquilt that gets recommended most often in budget-focused gear forums, and the reason is straightforward: OneTigris sells this underquilt in two distinct temperature variants — a three-season version rated 40°F to 68°F, and a dedicated winter version rated 23°F to 41°F — and buyers who specifically choose the winter SKU report real performance at the low end of that range. One verified buyer noted it kept them warm and toasty after dropping to 30°F on a first trip, with setup described as “a breeze” even with minor adjustment needed for fit.
What that means for you: don’t buy the wrong variant. The “Night Protector” name covers two different products with a roughly 17-degree gap between their comfort ranges, and several reviews online conflate the two because the underlying construction and branding look identical at a glance. If your trip plan includes nights in the 20s, you need the winter-rated SKU specifically, not the three-season default that shows up first in search results.
Construction-wise, the shell is 20D ripstop nylon with a DWR coating over a 300T polyester pongee lining, with the winter version using significantly more fill — roughly 1,200 grams versus 670 grams in the three-season model — which is where most of that added warmth comes from. One reviewer comparing it directly to the pricier ENO Blaze underquilt called it equal or better for less money, which is about as strong an “expert opinion” as crowd-sourced gear feedback gets.
Pros: Real winter-specific temperature rating, not just a marketing label · Strong value relative to premium-branded competitors · Simple bungee-and-carabiner setup
Cons: Easy to accidentally buy the wrong (warmer) variant · At ~42 oz, noticeably heavier than the three-season version
Pricing typically falls in the $70–$95 range for the winter variant — confirm you’re selecting “Winter” before checkout, since the listing bundles both options.
4. AYAMAYA Hammock Underquilt
The AYAMAYA Hammock Underquilt is the entry point for campers who want to try a winter-capable underquilt without committing real money to a system they’re not sure they’ll use again. The listing advertises a comfort range of 20°F to 68°F, with a 20D ripstop nylon shell, DWR coating, and 300T polyester pongee lining over an imitation-silk-floss fill.
Here’s the honest caveat the spec sheet glosses over: several AYAMAYA listings for closely related underquilts carry a parenthetical note reading “not for cold winter” right alongside that same 20°F-to-68°F claim — an inconsistency that shows up across multiple SKUs from this brand. Read that as a signal rather than a contradiction: treat this quilt as a genuinely capable three-season piece that can be pushed into the high 20s and low 30s when paired with a warm sleeping bag, not as a stand-alone deep-winter solution. Used that way — as the bottom half of a layered system rather than the whole answer — it performs about how you’d expect a budget synthetic underquilt to perform, with the usual trade-offs: it’s bulkier and heavier (2.5 to 3 pounds depending on the variant) than premium down options at a similar rating, and the synthetic fill won’t compress quite as small in your pack.
For someone testing whether they actually enjoy winter hammock camping before investing in a $150+ down quilt, this is exactly the right amount of gear and risk.
Pros: Lowest price point on this list by a wide margin · Wide cut that wraps generously around the hammock sides · DWR coating handles light precipitation fine
Cons: Inconsistent “winter” labeling across listings — pair with a bag, don’t rely on it alone below freezing · Heavier and bulkier than comparable down options
Typically priced in the $45–$65 range, which makes it the cheapest reasonable entry into bottom insulation on this list.
5. Go Outfitters Adventure Top Quilt
Most winter hammock guides spend all their attention on underquilts and treat the top half of the system as an afterthought. That’s a mistake, because a top quilt that restricts your movement will have you fighting your own gear all night instead of sleeping — and the Go Outfitters Adventure Top Quilt is built specifically to solve that. At 7 feet long and 53 inches wide, it’s oversized in a way that actually matters: it’s rated to 20°F, and its built-in foot pocket keeps it anchored in place all night, while side-release buckles let you connect the edges into a quasi-hood for added warmth in colder conditions.
The synthetic “Max Loft” fill is a deliberate choice for the same reason the Vulcan uses Primaloft — it tolerates the condensation that builds up on cold nights without losing loft, and it’s washable, which matters more than people expect after a few seasons of actual use. The quilt is also designed to let you regulate temperature through the night by bundling tighter or uncovering sections, much the way you would with a comforter at home, rather than locking you into one fixed warmth level the way a zipped mummy bag does.
The trade-off for that roominess is weight — at roughly 2 lbs 15 oz, it’s heavier than ultralight backpacking quilts in the same temperature class, which makes more sense for car camping and short-haul hammock trips than for multi-day backcountry hauls where every ounce gets weighed against your shoulders.
Pros: Genuinely freedom-of-movement design — sleep on your side without a fight · 20°F rating backed by real loft, not just marketing · Washable synthetic fill
Cons: Heavier than competing top quilts at the same rating · Bulkier pack size limits it for serious backpacking
Expect a price in the $75–$100 range depending on color and current promotions.
6. onewind Top Quilt -35°
When someone says “winter hammock camping” and actually means single-digit or sub-zero nights, this is the piece that belongs in the conversation. The onewind Top Quilt -35° is built around a closed footbox and a cinchable collar specifically engineered so you can seal the whole system tight against your body when conditions demand it, rather than relying on layering tricks to make up the difference.
What separates a -35° quilt from a 20°F quilt isn’t a single feature — it’s the cumulative effect of loft volume, shell treatment, and a tighter draft seal at the collar and footbox, all working together rather than any one component doing the job alone. That also means it’s overkill, and uncomfortably warm, for anything above the low 20s — this is purpose-built gear for a specific use case, not a do-everything quilt. If your “winter trips” mean the occasional 25°F night rather than a deliberate cold-weather expedition, the Go Outfitters pick above will serve you better and cost less.
Buyers who do push it into genuinely extreme conditions consistently flag the same two things in feedback: the footbox cinch system works as advertised for sealing out drafts, and the packed size is noticeably larger than the lighter quilts on this list, which is the unavoidable cost of carrying that much loft.
Pros: Purpose-built for genuine sub-zero performance, not just marketing language · Footbox and collar cinch system actually addresses real draft points
Cons: Significant overkill — and overheating risk — above the low 20s · Bulkiest pack size of any quilt on this list
Pricing generally sits in the $130–$170 range, reflecting both the fill volume and the niche use case.
7. ENO ProFly Rain Tarp
It’s tempting to treat a tarp as an afterthought next to underquilts and top quilts, but in winter conditions specifically, the ENO ProFly Rain Tarp does something neither of those can: it cuts the wind that’s actively stealing warmth from everything underneath it. Built from 70D ripstop nylon with a 1000mm PU coating and double-stitched waterproof seams, the ProFly measures 10’6″ by 6’4″ unfolded and packs down to a compact 8 x 4.5 x 4.5 inches at 22 ounces.
The six-point guy system with lineloc tensioners is what makes the difference in practice — more attachment points mean you can pitch it lower and tighter to the ground on the windward side, turning it from a rain shield into an actual wind break, which is exactly what a winter quilt system needs to perform at its rated temperature instead of underperforming in a 15 mph breeze. One detailed account from a real winter trip described pairing the ProFly with a DoubleNest, an Ember underquilt, and a separate sleeping bag, and reported a comfortable eight hours of sleep at 20°F — a useful data point for what a complete (not partial) system can achieve even with mid-tier individual components.
The most common complaint across reviews is that the initial attachment points can be flimsy out of the box, with a few buyers reporting a snapped clip on first use; the fix nearly everyone lands on is simply tying a knot instead of relying on the included hardware, which works fine as a permanent solution.
Pros: Genuine wind-cutting performance when pitched correctly, not just rain protection · Six guy points allow a tight, low pitch for cold-weather use · Compact and light enough to bring on every trip
Cons: Stock attachment clips can be weak — plan to reinforce or knot them · Doesn’t come with stakes, which is an easy thing to forget to budget for separately
Typical pricing falls in the $60–$85 range. Given how much wind protection contributes to your underquilt actually hitting its rated temperature, this is one of the least optional “accessories” on this entire list.
Building Your Sleep System: A Practical Layering Guide
Buying gear off a list is the easy part. Assembling it into something that actually keeps you warm at 2 a.m. is where most first attempts go sideways, so here’s the order of operations that avoids the usual mistakes.
Start with the hammock and straps, hung correctly. Use wide, tree-friendly webbing straps rather than rope or cord — better for the bark, and increasingly the expected standard at established sites, per Leave No Trace’s hammock-specific guidance. A 30-degree hang angle is the rule of thumb hammock campers repeat for good reason — too flat and you’ll feel every seam pressing into your back; too steep and you’ll slide toward the center and compress your insulation unevenly all night.
Attach the underquilt before you ever get in. It should hang loose, with a few inches of air gap between the quilt and the hammock body — this is the entire point of an underquilt, and cinching it tight against the fabric defeats the design. Most underquilts in this guide use shock-cord suspension specifically so you can dial in that gap rather than guessing.
Layer the top quilt or bag over yourself, not under. This sounds obvious until you’re tired and cold at a campsite in the dark, but a surprising number of winter hammock first-timers try to use a single bag as both layers and wonder why they’re freezing from below.
Pitch the tarp low and tight on the windward side before dark. Doing this in daylight, rather than scrambling for it after sunset, is the single biggest quality-of-life upgrade available to a winter hammock camper, and it costs nothing but ten extra minutes.
Keep one dry set of sleep clothes that never leaves your pack during the day. Damp base layers from a day of hiking will pull heat out of your whole system overnight — changing into bone-dry layers before you climb in does more for your warmth than almost any single piece of gear.
Real-World Scenarios: Matching Gear to Your Trip
The weekend tester. You’ve got one or two nights planned, temperatures in the high 20s to mid-30s, and you’re not sure yet if winter hammocking is for you. The AYAMAYA underquilt paired with the Go Outfitters top quilt and a sleeping bag liner gets you a functional system for well under $200 total — enough to find out if you like this before spending real money.
The recurring three-season hanger extending into late fall. You already own a DoubleNest and just need the cold-weather pieces. The ENO Vulcan underquilt and OneTigris winter-rated Night Protector both work here; the Vulcan if wind resistance matters more on your usual sites, the OneTigris if straight cold-rating-per-dollar is the priority.
The deliberate winter expedition camper. Single-digit forecasts, multi-night trips, no margin for a gear failure. This is the onewind -35° top quilt territory, paired with a true winter-rated underquilt and the ProFly pitched aggressively low. Budget accordingly — this tier of gear isn’t cheap, and it shouldn’t be, given what it’s actually being asked to do.
Problem → Solution: Fixing the Five Most Common Cold-Hammock Complaints
“My underquilt feels useless.” Nine times out of ten, it’s hung too tight against the hammock body, eliminating the air gap that makes it function as insulation rather than just a wind shell. Loosen the shock cords until you can see daylight between the quilt and the fabric.
“I’m warm on top but freezing underneath.” This is cold-butt syndrome in its purest form, and it almost always means the underquilt is either undersized, underrated for the conditions, or both. No amount of top-quilt warmth compensates for a gap in bottom insulation.
“Condensation is soaking my quilt.” Synthetic fill (as used in the Vulcan, the AYAMAYA, and the Go Outfitters quilt) tolerates this far better than down, which is exactly why most budget and mid-range winter quilts default to it. If you’re using a down product, a vapor-permeable shell and good campsite ventilation matter more than they would in summer.
“Wind is cutting straight through my setup.” This is a tarp problem, not a quilt problem. Re-pitch lower and tighter on the windward side, and consider that even a 30°F-rated underquilt can underperform badly once a 15 mph wind is involved.
“I keep sliding to the center of the hammock.” Usually a hang-angle issue — your suspension is too steep. Flattening the hang to roughly 30 degrees from horizontal distributes your weight more evenly and reduces both sliding and uneven insulation compression.
How to Choose Winter Hammock Gear: 6 Criteria That Matter
- Match the temperature rating to your actual coldest expected night, not your average night. Gear rated for the worst case performs comfortably the rest of the time; gear rated for the average leaves you exposed exactly when it matters.
- Prioritize the underquilt over every other purchase. It’s solving the problem unique to hammock camping that ground camping gear never had to address.
- Choose synthetic fill if condensation or wet conditions are likely; choose down if pack size and weight are the priority and you can keep it dry.
- Buy a tarp with enough guy points to pitch low and tight, not just one that “covers” the hammock. Coverage and wind-blocking are different jobs.
- Don’t undersize the top quilt for the sake of weight savings if you’re a side- or stomach-sleeper. A quilt that restricts movement gets fought with all night instead of slept in.
- Budget for the whole system, not just the headline piece. A premium underquilt paired with no tarp underperforms a mid-range underquilt paired with a well-pitched one.
Underquilt vs. Sleeping Pad: Which Wins Below Freezing
A foam or inflatable sleeping pad can technically be used inside a hammock, wedged between your body and the fabric, and some ultralight campers do exactly that to save weight. But the geometry works against it: a pad designed for a flat tent floor doesn’t conform to a curved hammock body, leaving gaps at the shoulders and hips exactly where you can least afford them. Foam pads are also a vapor barrier in their own right and can cause condensation buildup overnight, which is the opposite of what most winter campers want from their insulation layer.
The honest verdict: a sleeping pad is a viable emergency backup or an ultralight summer-shoulder-season trick, but a dedicated underquilt — which hangs loose and insulates without the compression and gap problems a pad introduces — is the correct tool for the job once temperatures drop into true winter territory. For perspective on insulation choices generally, REI’s breakdown of down versus synthetic fill notes that down sleeping bags are lighter and pack down smaller without losing warmth, making them appealing for cold, dry conditions, while synthetic insulation costs less and continues to insulate even when wet. The same logic applies almost directly to underquilts.
Common Mistakes First-Time Winter Hammock Campers Make
The single most common mistake is buying a quilt rated for the average forecast temperature instead of the coldest hour of the coldest night — a 30°F-rated underquilt at an actual overnight low of 28°F is fine; at 18°F, it’s a long night. The second most common mistake is skipping the tarp on a “clear night” forecast, only to discover that a clear night is also a still, radiational-cooling night where ground-level cold settles in hard. The third, and most avoidable: setting up the underquilt cinched tight against the hammock fabric instead of letting it hang loose, which quietly defeats the entire mechanism the product is designed around.
A less obvious one: underestimating how much your hang angle affects insulation performance. A too-flat or too-steep hang shifts your weight unevenly across the underquilt, creating localized compression and cold spots even with otherwise adequate gear.
What to Expect: Real-World Performance at Different Temperature Bands
In the high 30s to mid 40s, a budget underquilt like the AYAMAYA paired with any reasonable top quilt or bag is comfortable without much fuss — this is genuinely easy territory.
In the high 20s to mid 30s, the gap between adequate and uncomfortable gear starts to show. This is where the ENO Vulcan and OneTigris three-season-vs-winter distinction actually matters, and where a tarp stops being optional.
In the teens and low 20s, you need gear specifically rated for that range, pitched and assembled correctly, with no shortcuts — this is the OneTigris winter variant or Go Outfitters top quilt territory, used as a matched system rather than mixed with summer pieces.
Below the teens, you’re in onewind -35°-quilt territory, and the margin for setup error shrinks considerably. It’s worth remembering that hypothermia can occur even at temperatures above 40°F if a person becomes chilled from rain, sweat, or wind exposure — meaning the temperature rating on a quilt tag is only one variable among several that determine whether a night is comfortable or genuinely risky.
Long-Term Cost & Maintenance of a Winter Hammock System
A full budget system — DoubleNest, AYAMAYA underquilt, Go Outfitters top quilt, ProFly tarp — typically lands somewhere in the $250–$350 range all-in, before straps. A premium system built around the Vulcan or onewind quilts and better straps can run $400–$550. Either way, this gear is largely a one-time purchase: synthetic-fill underquilts and top quilts, stored loosely (not permanently compressed) between trips, commonly last five to ten seasons with no special care beyond occasional spot-cleaning and air-drying after any trip involving condensation or rain. The main maintenance habit worth building is simple — never store these quilts compressed in their stuff sacks long-term, since prolonged compression breaks down loft over time regardless of fill type.
Features That Actually Matter (And the Marketing Language That Doesn’t)
A temperature rating in isolation is close to meaningless without knowing whether it’s tested with wind, and most consumer-grade underquilts don’t publish that methodology — treat any rating as a “calm night, dry conditions” baseline and plan a margin below it. “4-season” on a product label is frequently marketing shorthand rather than a verified standard; the AYAMAYA listings in this guide are a direct example of how loosely that term gets applied even within a single brand’s product line. What does matter, consistently, across every product reviewed here: shell coating (DWR or PU) for handling condensation and light precipitation, suspension adjustability for dialing in the loose hang an underquilt needs, and guy-point count on a tarp for actually achieving a tight, wind-blocking pitch rather than just loose coverage.

Frequently Asked Questions
❓ What temperature rating do I need for winter hammock camping?
❓ Can you hammock camp in below-freezing temperatures?
❓ Is an underquilt or a sleeping pad better for winter hammock camping?
❓ Do I need both a top quilt and an underquilt for winter hammock camping?
❓ How much does a full winter hammock camping setup cost?
Conclusion
The gap between a miserable winter hammock trip and a genuinely comfortable one almost never comes down to one heroic piece of gear — it comes down to whether the underquilt, top quilt, and tarp are actually matched to each other and to the night you’re expecting. Buy the DoubleNest or whatever shell you like, but spend your real attention on the underquilt rating, hang the thing with a loose air gap, and don’t skip the tarp on a “clear” forecast. Get those three decisions right, and the gear on this list will do exactly what it’s built to do — including on the night it actually matters.
Recommended for You
- 7 Best Hammock Stands for Camping in 2026 (No Trees Needed)
- ENO Hammock Review for Camping: 7 Best Models Tested in 2026
- 7 Best Ultralight Hammock for Backpacking (2026)
Disclaimer: This article contains affiliate links. As an Amazon Associate, I earn from qualifying purchases. If you purchase products through these links, we may earn a small commission at no additional cost to you.
Found this helpful? Share it with a friend who’s still sleeping cold in their hammock.