In This Article
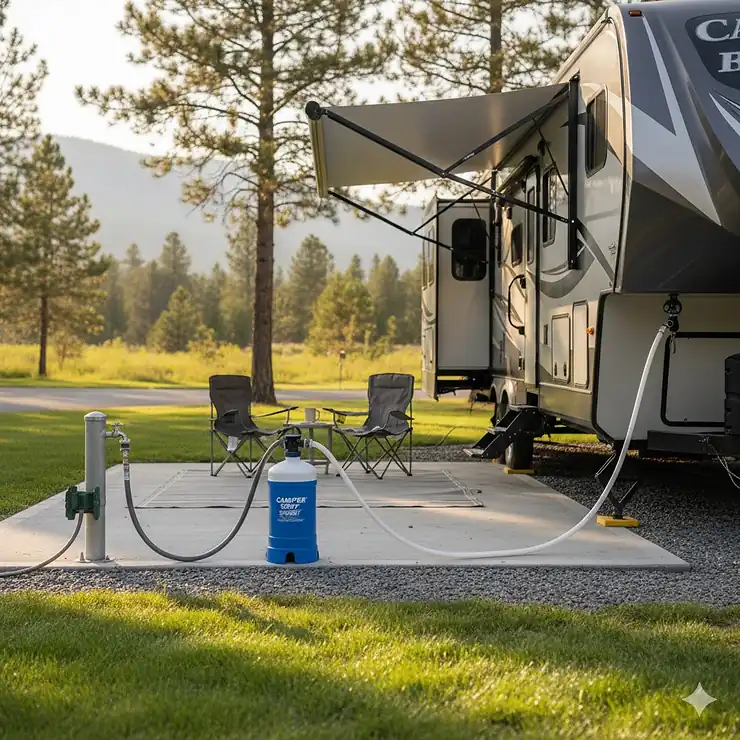
Picture this: You’re parked at a beautiful campground in Arizona, ready to enjoy a relaxing shower after a long day of hiking. But the water feels grimy, leaves your skin feeling sticky, and creates an impossible-to-remove film on your RV’s shower doors. Sound familiar? You’re dealing with hard water, and it’s one of the most common headaches for RV enthusiasts across America.
A water softener for camper isn’t just about comfort; it’s about protecting your investment. Hard water contains high concentrations of dissolved calcium and magnesium minerals, and according to the U.S. Geological Survey, these minerals can cause serious damage to your RV’s plumbing system, water heater, and appliances. When I installed my first camper water softener three years ago, I noticed an immediate difference – softer skin, cleaner dishes, and most importantly, no more mineral buildup clogging my expensive water fixtures. Whether you’re a weekend warrior or a full-time RVer, choosing the right water softener for camper can save you thousands in repair costs while dramatically improving your quality of life on the road.
Quick Comparison Table
| Product | Grain Capacity | Weight | Dimensions | Price Range | Best For |
|---|---|---|---|---|---|
| On The Go OTG4-DBLSOFT | 16,000 grains | ~30 lbs | 22″H x 9.5″dia | $$$$ | Heavy users, larger RVs |
| Camco TastePURE | 10,000 grains | ~18 lbs | 20.5″H x 8.5″dia | $$ | Budget-conscious campers |
| RVGUARD 16,000 | 16,000 grains | ~25 lbs | 22″H x 9″dia | $$$ | Value seekers |
| VEVOR RV Softener | 16,000 grains | ~28 lbs | 21″H x 9.5″dia | $$$ | Quality & accessories |
| Blu Technology | 10,000 grains | 17.8 lbs | 17″H x 8″dia | $$$ | Compact spaces |
| WECO Mini SOFT-RV-0918 | 7,300-14,600 grains | ~20 lbs | 18″H x 9″dia | $$ | Small to mid-size campers |
| NPGLOBAL Portable | 16,000 grains | ~26 lbs | 21″H x 9″dia | $$$ | Family RVers |
💬 Just one click – help others make better buying decisions too! 😊
Top 7 Water Softener for Camper: Expert Analysis
1. On The Go OTG4-DBLSOFT-Portable 16,000 Grain Water Softener
If you’re serious about water quality in your camper, the On The Go OTG4-DBLSOFT represents the gold standard. Assembled by U.S. workers in Indiana, this powerhouse delivers approximately 40% more soft water than comparable units on the market.
Key Specifications:
- 16,000 grain capacity (largest compact RV softener available)
- Produces up to 1,600 gallons or 40 days of soft water
- Compact design: 22″H x 9.50″ diameter
- Regenerates with just 2 boxes of table salt in under 30 minutes
Customer Experience: RV owners consistently praise this unit’s exceptional performance in extremely hard water conditions. One Arizona-based user reported running 300 gallons through it in Yuma with minimal hardness changes. The high-grade premium resin handles even the toughest water sources, and the large mouth opening makes salt addition effortless.
✅ Pros:
- Highest capacity in compact size
- Made in USA with quality components
- Fast regeneration process
- Travel-friendly cap and plug system
❌ Cons:
- Higher price point
- Heavier than smaller capacity units
Price Range: $350-$450 (varies by retailer)
2. Camco TastePURE Portable Water Softener
The Camco TastePURE is your wallet-friendly gateway into the world of soft water. Don’t let the budget price fool you – this 10,000-grain unit punches well above its weight class and comes from a trusted name in RV accessories.
Key Specifications:
- 10,000 grain capacity
- Flow rates up to 4 GPM
- Includes 50 test strips, 4-foot hose, and fittings
- Measures 20.5″H x 8.5″ diameter
- Convenient carry handle
Customer Experience: Perfect for weekend campers and those with moderately hard water, users appreciate the complete kit that’s ready to use right out of the box. The included test strips help you monitor water quality and know exactly when regeneration is needed.
✅ Pros:
- Excellent value for money
- Complete accessory package included
- Compact and lightweight
- Trusted Camco brand reliability
❌ Cons:
- Lower capacity requires more frequent regeneration
- Slower flow rate than larger models
Price Range: $120-$180
3. RVGUARD 16,000 Grains Portable Water Softener
The RVGUARD unit delivers premium performance without the premium price tag. With food-grade resin and comprehensive accessories, it’s designed specifically for the demanding RV lifestyle.
Key Specifications:
- 16,000 grain capacity
- Includes fabric cover, PTFE tape, multiple connectors
- Food-grade premium resin
- Provides 40% softer water than before installation
- Complete accessory kit with Y-splitter, valves, and adapters
Customer Experience: Users love the complete package approach – everything you need comes in the box, from hose adapters to sealing O-rings. The included fabric cover protects your investment during storage, and customers report excellent customer support from RVGUARD.
✅ Pros:
- Comprehensive accessory package
- Food-grade materials
- Strong customer support
- Great value proposition
❌ Cons:
- Newer brand with less long-term user data
- Instructions could be more detailed
Price Range: $180-$250
4. VEVOR RV Water Softener 16,000 Grain
VEVOR brings industrial quality to the portable water softener market. This robust unit features premium materials and thoughtful engineering that RV enthusiasts appreciate.
Key Specifications:
- 16,000 grain capacity
- 3/4″ brass fittings and 42″ hose included
- Glass fiber shell with NFS polyethylene tank
- Maximum pressure rating of 150 psi
- Food-grade resin lasts approximately 5 years
- Provides up to 2,461 gallons (at 6.5 gpg hardness)
Customer Experience: Full-time RVers particularly appreciate this unit’s durability and the elimination of calcium buildup on fixtures. Recent reviewers note its excellent performance in heavy-use scenarios, with some using it for weeks without needing regeneration when paired with another softener.
✅ Pros:
- Heavy-duty construction
- High pressure rating
- Long-lasting resin
- Minimal maintenance required
❌ Cons:
- Heavier weight for transport
- Higher initial investment
Price Range: $200-$280
5. Blu Technology Portable RV Water Softener
The Blu Technology unit stands out with its stainless steel construction and patented design. It’s the lightest 10,000-grain softener on our list, perfect for campers watching every pound.
Key Specifications:
- 10,000 grain capacity
- Rugged stainless steel tank
- Stainless steel quick connects
- Weights only 17.8 lbs
- Dimensions: 8″W x 8″D x 17″H
- Resin lasts 7-9 years (exceptional longevity)
Customer Experience: The stainless steel construction makes this unit virtually indestructible – perfect for the bumps and jolts of RV travel. Users report that the quick-connect fittings make setup genuinely take less than five minutes, and the compact size fits in the tightest storage bays.
✅ Pros:
- Stainless steel durability
- Exceptionally long resin life
- Lightest weight in class
- Corrosion resistant
❌ Cons:
- Smaller capacity means more frequent regeneration
- Premium materials command higher price
Price Range: $250-$320
6. WECO Portable Mini Softener (SOFT-RV-0918)
WECO, a prominent California-based manufacturer, delivers water softening expertise in this versatile portable unit. It’s engineered by Water Quality Association (WQA)-certified specialists who understand RV needs.
Key Specifications:
- 7,300-14,600 grain capacity range
- 9″ diameter x 18″ height
- Approximately 7 lbs of salt per regeneration
- Capacity: 485-970 gallons (based on 15 GPG hardness)
- Includes garden hose connectors and test kit
- 6-foot drinking water rated garden hose included
Customer Experience: This California-made unit offers professional-grade water treatment in a compact package. Users appreciate the included wrench for easy fill port removal and the simple in/out design that minimizes potential leak points.
✅ Pros:
- Professional WQA-certified engineering
- Variable capacity suits different needs
- Made by specialized water filtration company
- Simple, reliable design
❌ Cons:
- Mid-range capacity
- Requires more salt per regeneration cycle
Price Range: $150-$220
7. NPGLOBAL RV Water Softener Portable 16,000 Grain
NPGLOBAL brings a family-focused approach to water softening, combining high capacity with user-friendly features. It’s designed by RV enthusiasts for RV enthusiasts.
Key Specifications:
- 16,000 grain capacity
- 3/4″ GHT (Garden Hose Thread) fittings
- Removes heavy metals including iron, lead, and radium
- Portable design for multiple applications
- Works for RVs, boats, mobile car washing, pressure washing
Customer Experience: Small business charm meets big performance. Users report dramatic improvements in water smell and taste, with the rotten egg odor from hard water completely eliminated. The softener also proves useful beyond RV applications – many owners use it for mobile detailing businesses.
✅ Pros:
- Family-owned business with personal service
- Multi-purpose functionality
- Removes water odors effectively
- Protects skin and hair from hard water damage
❌ Cons:
- Smaller company means less widespread availability
- Limited long-term user reviews
Price Range: $190-$270
Understanding Hard Water in Campgrounds
Have you ever wondered why the water at one campground feels completely different from another? According to Wikipedia, hard water forms when water percolates through limestone, chalk, or gypsum deposits, picking up calcium and magnesium along the way. In the United States, water hardness varies dramatically by region, with areas like Arizona, Nevada, and parts of Texas experiencing extremely hard water (often exceeding 180 parts per million).
When you hook up your camper at a new location, you’re essentially at the mercy of the local water supply. Campgrounds that rely on well water typically have harder water than those connected to municipal systems. This matters because hard water can reduce equipment life, increase heating costs, lower water heater efficiency, and clog pipes. I’ve witnessed firsthand how quickly mineral deposits can accumulate in an RV water heater – one season of hard water exposure without a softener resulted in a $800 replacement bill for my neighbor.
How Water Hardness Affects Your Camper
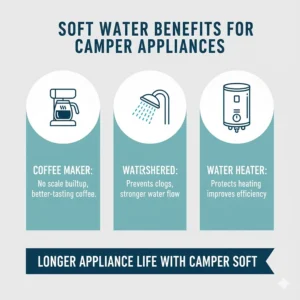
The impact of hard water extends far beyond just feeling a bit “off” during your shower. Those calcium and magnesium minerals create a domino effect throughout your RV’s entire water system. Your water heater works overtime trying to heat water through layers of scale buildup, consuming more propane or electricity. Your faucets develop white crusty deposits that can’t be scrubbed away. Your shower curtain becomes a breeding ground for soap scum. Even your clothes come out of the washer feeling stiff and scratchy. The investment in a water softener for camper pays for itself within the first season by preventing these headaches and protecting your expensive RV components from premature failure.
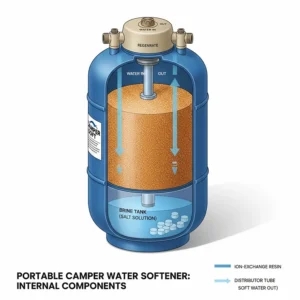
How Does a Water Softener for Camper Work?
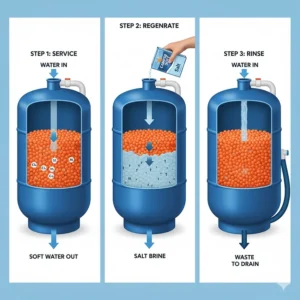
The magic behind portable water softeners lies in a process called ion exchange – and it’s simpler than you might think. Inside every water softener tank, thousands of tiny resin beads sit waiting to do their job. These beads carry a negative electrical charge and are initially coated with sodium ions. When hard water flows through the tank, something fascinating happens: the calcium and magnesium ions (which have a stronger positive charge than sodium) essentially push the sodium ions aside and attach themselves to the resin beads. The water that exits the other side is now “soft” because those problematic hardness minerals have been trapped inside the tank.
But here’s where it gets even more interesting – these resin beads aren’t a one-time deal. When they become saturated with calcium and magnesium (which usually happens after several hundred to a few thousand gallons, depending on water hardness and tank capacity), you simply regenerate the system. During regeneration, you add regular table salt to the tank and flush water through it. The high concentration of sodium in the salt water reverses the ion exchange process, forcing the calcium and magnesium off the beads and down the drain. Fresh sodium ions reattach to the beads, and your softener is ready for another cycle. Most camper water softener units can be regenerated in 30-45 minutes using just 2-4 boxes of ordinary table salt – no expensive specialty chemicals required. The resin beads in quality units can last 5-10 years with proper maintenance, making these systems remarkably cost-effective over time.
Choosing the Right Grain Capacity for Your Needs
Understanding Grain Capacity
Grain capacity might sound like technical jargon, but it’s actually quite straightforward. One grain equals 64.8 milligrams of calcium carbonate, and the grain capacity tells you how many grains of hardness minerals the softener can remove before needing regeneration. Here’s the practical math that matters: if your water tests at 10 grains per gallon (gpg) of hardness and you have a 10,000-grain softener, you’ll get approximately 1,000 gallons of soft water before regeneration is needed (10,000 grains ÷ 10 gpg = 1,000 gallons).
Calculating Your Requirements
Think about your typical camping patterns. A weekend warrior who uses 50 gallons per day can stretch a 10,000-grain softener for 20 days in moderately hard water. But a family of four full-timing in their RV might use 150 gallons daily, meaning that same softener would need regeneration every 6-7 days. I always recommend sizing up rather than down – the few extra pounds and inches are worth avoiding the hassle of frequent regeneration cycles. For solo travelers or couples, 8,000-10,000 grains works beautifully. Families and heavy water users should target 16,000-grain models for the best balance of convenience and performance.
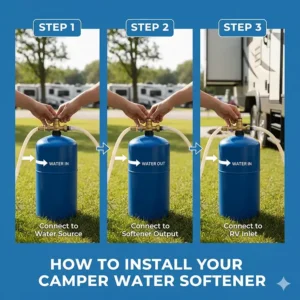
Installation Guide: Setting Up Your Water Softener
Step-by-Step Installation Process
Step 1: Position your softener between the campground water source and your RV. Choose a level spot where it won’t tip over and can drain properly during regeneration.
Step 2: Connect your fresh water hose from the campground faucet to the INLET side of the softener (usually clearly marked). Always use Teflon tape on threaded connections to prevent leaks.
Step 3: Attach a second hose from the OUTLET side of the softener to your RV’s water inlet. Pro tip: use a pressure regulator before the softener to protect both the unit and your RV’s plumbing.
Step 4: Before first use, perform an initial flush. Turn on the water and let it run through the system for 2-3 minutes for smaller units, up to 7-9 minutes for larger models. This removes any resin dust from manufacturing.
Step 5: Test your output water using the included hardness test strips (most units include these). You should see readings of 0-3 grains per gallon, confirming proper softening.
Common Installation Mistakes to Avoid
The most frequent error I see is installing the unit backwards – always double-check that water flows from inlet to outlet as marked. Another pitfall is forgetting to secure the unit properly; a tipping softener during regeneration creates a messy situation. Many newbies also skip the initial flush, leading to cloudy water from resin dust. Finally, don’t overtighten connections – hand-tight plus a quarter turn with a wrench is sufficient for hose connections. Cross-threading can crack plastic fittings and cause persistent leaks that ruin your camping weekend.
Regeneration Process: Maintaining Your Softener
Understanding regeneration transforms you from a nervous first-timer into a confident water softener owner. When your test strips show hardness levels creeping above 3 gpg, or you notice that tell-tale filmy feeling returning to your water, it’s regeneration time. The process itself is remarkably straightforward, though it requires about 30-60 minutes depending on your unit size.
Detailed Regeneration Steps
Phase 1: Preparation – Turn off your water supply and disconnect the outlet hose from your softener. Position the outlet to drain into a bucket or suitable drainage area. Remove the top cap carefully; some pressure may have built up inside.
Phase 2: Salt Addition – Pour in 2 boxes (about 52 ounces) of plain table salt for 8,000-10,000 grain units, or 4 boxes for 16,000-grain models. You can use iodized or non-iodized salt, though many RVers prefer iodized for slightly faster dissolution. Some folks mix the salt with warm water before adding for even quicker results.
Phase 3: Slow Rinse – This is critical: turn your water on to just a trickle – about the diameter of a pencil. This slow flow ensures the salt brine thoroughly saturates the resin beads. Maintain this flow for 12-30 minutes for smaller units, up to 50-60 minutes for 16,000-grain models.
Phase 4: Fast Rinse – Crank the water up to full flow for the final flush, running for 3-12 minutes depending on unit size. This removes all remaining brine and any dislodged minerals.
Phase 5: Verification – Test your output water with test strips. You should see 0-3 gpg hardness and taste no salt residue. If readings are still high, you may need to perform a special regeneration cycle (consult your manual).
Water Softener vs. Water Filter: What’s the Difference?
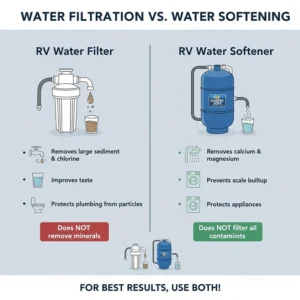
This confusion trips up countless first-time RV owners, so let’s clear it up once and for all. A water softener and a water filter serve entirely different purposes, and ideally, you want both in your system. Think of it this way: a water filter is like a security guard, blocking unwanted visitors (sediment, chlorine, bacteria, bad taste and odors) from entering your RV. A water softener, on the other hand, is like a chemical transformer, actually changing the composition of your water by removing hardness minerals.
Water filters use physical or chemical media to trap contaminants. They’re measured in microns (how small a particle they can catch) and rated for specific contaminants like sediment, chlorine, or even viruses in advanced models. Water softeners use ion exchange resin to swap hardness minerals for sodium ions. You can have crystal-clear, great-tasting filtered water that’s still rock-hard and will wreak havoc on your water heater. Conversely, you can have beautifully soft water that still contains chlorine taste or sediment particles.
The Ideal Setup
Smart RVers run a sequence: sediment filter first (catches dirt and debris), then the water softener (removes hardness), followed by a carbon filter (removes chlorine and improves taste). This three-stage approach gives you water that’s clean, soft, and delicious. I’ve been running this setup for years, and it’s the difference between merely surviving and truly thriving on the road.
Benefits of Using a Camper Water Softener
Protection for Your RV Investment
Your RV represents a significant financial commitment, and a water softener acts as affordable insurance for your plumbing infrastructure. Scale buildup in water heaters can reduce efficiency by 30% or more, forcing your unit to consume extra propane or electricity. Even worse, heavy mineral deposits eventually crack tank seams and corrode heating elements, turning a $50 softener investment into a $1,000+ water heater replacement. I’ve seen five-year-old RVs with pristine exteriors but completely destroyed plumbing because owners ignored water quality.
Personal Comfort and Health Benefits
The difference in daily living is remarkable. Soft water allows soap and shampoo to lather properly, meaning you use less product and get better results. Your skin feels smoother and less dry because soft water rinses completely, unlike hard water which leaves mineral residue that clogs pores. Hair becomes shinier and more manageable – my wife noticed this change within days of installing our first softener. Clothes washed in soft water feel softer, last longer, and retain their colors better. For people with eczema or sensitive skin conditions, the reduction in mineral exposure can provide genuine relief.
Economic Advantages
Beyond preventing repair bills, soft water saves money on a day-to-day basis. You’ll use 50% less soap, shampoo, and detergent because these products work efficiently without fighting mineral interference. Dishes come out of the washer spot-free without expensive rinse aids. Your coffee tastes better because the water isn’t competing with mineral flavors. Add it all up over a camping season, and the savings easily exceed the cost of the softener itself, making this one of the smartest upgrades any RV owner can make.
Maintenance Tips for Long-Term Performance
Regular Backflushing
Every three months, perform a backflush cycle to remove accumulated sediment and prevent resin bed compaction. Simply reverse the water flow through your softener for 3-5 minutes (use the female-to-female adapter included with most units). This simple maintenance task can extend your softener’s life by years and maintain peak efficiency.
Resin Bed Rejuvenation
Even with regular regeneration, resin beads can become fouled with iron, tannins, or organic matter over time. Once or twice yearly, add a resin bed cleaner (like OUT Filter Mate) during your regeneration cycle. These specialized cleaners strip away buildup that salt alone can’t remove, restoring your softener to like-new performance.
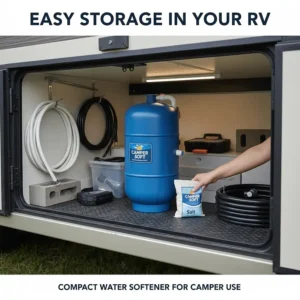
Storage Considerations
When winterizing your RV or storing your softener for extended periods, proper care prevents damage. Perform a full regeneration, then drain as much water as possible from the tank. Add a small amount of RV antifreeze if storing in freezing conditions. Store the unit upright with caps securely tightened to prevent resin from drying out completely. I learned this lesson the hard way when resin in my first softener cracked and lost effectiveness after improper winter storage.
Pre-Filter Protection
Installing an inexpensive sediment filter before your water softener is one of the best moves you can make. This $15 filter catches sand, rust, and debris that would otherwise clog your resin bed and reduce efficiency. Change this pre-filter monthly during heavy use, and your softener will reward you with years of trouble-free performance.
Testing Your Water Hardness
Using Test Strips
Most water softener kits include hardness test strips, and learning to use them takes about 30 seconds. Dip the strip in your water source (before the softener) for one second, shake off excess water, and wait 15 seconds. Compare the color change to the chart provided. Green typically indicates soft water (0-3 gpg), progressing through yellow, orange, and red for increasingly hard water. Test both your input and output water – input tells you what you’re dealing with, output confirms your softener is working.
When to Test
Check your input water at each new campground – water hardness varies wildly even within the same state. Arizona campgrounds might measure 15-20 gpg, while Oregon locations could be 5 gpg or less. Monitor your output water weekly to catch any issues before they become problems. If output hardness creeps above 3 gpg, schedule a regeneration soon. This proactive approach prevents hard water damage during the gap between when resin becomes saturated and when you notice water quality declining.
Best Practices for Different Camping Scenarios
Weekend Camping
For short trips (2-4 days), a 10,000-grain softener like the Camco TastePURE or Blu Technology unit provides plenty of capacity without the weight and bulk of larger models. You’ll typically use 50-100 gallons over a weekend, well within the range before regeneration. Pack your softener with your hoses and pressure regulator, and setup takes under 5 minutes at your site.
Extended Boondocking
Dry camping without hookups requires a different strategy. Since you’re likely conserving water anyway (maybe 20-30 gallons per day), even a smaller softener will last through a week-long boondocking session. The challenge comes with regeneration – you’ll need access to running water and a drain point. Plan regeneration cycles when you hit a campground with facilities, or carry extra water specifically for this purpose.
Full-Time RV Living
Full-timers need the big guns: 16,000-grain models like the On The Go OTG4-DBLSOFT or VEVOR units. With daily water usage ranging from 100-200 gallons for a couple, these larger softeners provide 2-4 weeks between regenerations in moderately hard water. Consider a permanent installation with dedicated plumbing if you’re staying put for months, but keep the portable option for travel flexibility.
Troubleshooting Common Issues
Water Still Feels Hard After Softening
First, verify you haven’t installed the unit backwards – it happens more often than you’d think. Test your output water with strips; if it shows 0-3 gpg but still feels hard, you might be experiencing sodium sensitivity (rare, but real). If test strips show high hardness at output, perform a special regeneration cycle with double the normal salt. Your resin may also be exhausted if the unit is several years old – replacement resin costs $30-50 and restores performance.
Salty Taste in Output Water
This indicates incomplete rinsing after regeneration. Run an extra fast rinse cycle for 10-15 minutes until the taste disappears. Test strips should show 0-3 gpg with no salty flavor. If the problem persists, you may have used too much salt during regeneration or your slow rinse phase was too short.
Leaking Connections
Ninety percent of leaks occur at hose connections from cross-threading or insufficient Teflon tape. Disconnect the leaking fitting, inspect threads for damage, wrap with 3-4 layers of Teflon tape (wrapping in the direction you’ll turn the fitting), and reconnect. Don’t overtighten – hand-tight plus a quarter turn is perfect. If the tank cap leaks, check the O-ring for damage and replace if necessary (most units include spare O-rings).
Low Flow Rate
Reduced flow usually means resin bed compaction or sediment accumulation. Perform a backflush cycle as described earlier. If flow remains restricted, remove the inlet filter screen (if equipped) and clean thoroughly. In extreme cases, the entire resin bed may need replacement.
Cost Analysis: Investment vs. Savings
Initial Investment
Quality portable water softeners range from $120 for basic 10,000-grain units to $450 for premium 16,000-grain models with advanced features. Your ideal choice depends on usage patterns and budget. Budget-conscious weekenders can thrive with entry-level models, while full-timers should view a premium softener as essential equipment, not an optional accessory.
Operating Costs
Regeneration salt costs about $3-5 per cycle (using generic table salt from the grocery store). If you regenerate every two weeks, that’s roughly $100 annually – far less than most RV owners spend on water filters. Resin bed cleaner runs another $15-20 per year. Total annual operating costs: $120-150 for active users.
Cost Savings
Here’s where the math gets exciting. A replacement RV water heater costs $600-1,200 installed. Faucets and shower heads run $50-200 each. Reduced soap and detergent usage saves $100+ yearly. Prevented scale damage to washing machines, dishwashers, and ice makers? Potentially thousands over your RV’s lifetime. The return on investment becomes positive within the first year for most users, and increasingly beneficial every season thereafter.
Environmental Considerations
Water Usage During Regeneration
Regeneration does consume water – typically 20-40 gallons depending on unit size and whether you perform a backflush. This represents your only significant “waste” from the system. Some eco-conscious RVers collect slow rinse water for non-potable uses (washing wheels, flushing outdoor spigots) before the fast rinse phase, minimizing waste.
Salt Discharge
The spent brine from regeneration contains concentrated calcium, magnesium, and chloride. While not toxic, it’s high in dissolved solids. Always regenerate at designated dump stations or approved drainage areas, never directly onto vegetation or natural water sources. Most campgrounds have specific guidelines for brine disposal – follow them.
Reduced Chemical Use
Soft water’s greatest environmental benefit is dramatically reduced detergent and soap consumption. Less soap means fewer phosphates and surfactants entering wastewater systems. Your smaller chemical footprint extends from laundry detergent to dish soap to shampoo – every bottle lasts twice as long, and you’re releasing half the pollutants into the environment.
❓ FAQ
❓ How often should I regenerate my water softener for camper?
❓ Can I use water while regenerating my camper water softener?
❓ What type of salt works best for regenerating portable RV softeners?
❓ Will a water softener remove the sulfur smell from campground water?
❓ How long does resin last in a portable water softener for camper?
Conclusion
Choosing the best water softener for camper transforms your RV experience from tolerating subpar water quality to enjoying home-like comfort on every adventure. Whether you opt for the budget-friendly Camco TastePURE, the heavy-duty On The Go OTG4-DBLSOFT, or any of the excellent options we’ve reviewed, you’re making a smart investment in your RV’s longevity and your personal comfort.
The reality is simple: hard water damage accumulates silently until you’re facing expensive repairs. Meanwhile, soft water provides immediate benefits you’ll notice daily – better showers, cleaner dishes, softer clothes, and protected plumbing. After three years of using portable water softeners across dozens of campgrounds, I can’t imagine RV life without one.
My top recommendation for most campers? The RVGUARD 16,000 Grains offers the sweet spot of capacity, price, and included accessories. Weekend warriors on a budget will love the Camco TastePURE, while full-timers demanding maximum durability should seriously consider the On The Go OTG4-DBLSOFT. Whichever you choose, test your water regularly, maintain your softener properly, and enjoy the remarkable difference soft water makes on the road.
Recommended for You
- Best Camper Water Pump 2025: 7 Top Choices for Perfect Pressure
- 7 Best Truck Camper Tie Downs for Safe Travel 2025
- 7 Best Camping Tarps 2025: Waterproof Shelter Guide
Disclaimer: This article contains affiliate links. If you purchase products through these links, we may earn a small commission at no additional cost to you.
✨ Found this helpful? Share it with your friends! 💬🤗